Tkinter Python : シンプルなGUIツール作成
はじめに
こんにちは。SHIFT 自動化アーキテクトの荻野です。
作業をする上で、「この作業自動化したいな」と感じても、やりたいことにマッチするツールがない場合などあると思います。 今回は、Pythonで簡易的なGUIツールが作成できるTkinterについて紹介し、作業の自動化の助けになればと思います。
GUI(グラフィカルユーザーインターフェース)は、コンピュータを直感的に操作できるように設計された視覚的なインターフェースです。PythonでGUIを作成するには、いくつかのライブラリが存在しますが、その中でもTKinterは最も一般的であり、Pythonにバンドルされている唯一のGUIライブラリです。
Tkinter(ティーケーインター)とは
PythonやRubyなどのGUI作成を支援するための標準ライブラリの一つです。 シンプルで使いやすく、プログラミング初心者でも実装しやすいのが特徴です。 Tkinterを使用すると、ボタン・メニュー・テキストボックスなどのウィジェットを含むウィンドウを簡単に作成できます。 TK(Tool Kitの略)と呼ばれるGUIインターフェースを使用できるライブラリです。
導入について
TkinterはPythonの標準ライブラリのため、導入はPythonをインストールするだけで完結します。
Download Python | Python.org https://www.python.org/downloads/
Tkinterの基本操作について
Tkinterの基本的な使い方を学ぶために、ウィンドウを作成し、ウィンドウ状にボタンを配置するプログラムを作成します。
import tkinter
import tkinter.messagebox

def say_helloWorld():
    tkinter.messagebox.showinfo(title="Say",message="Hello, World!")

root = tkinter.Tk()
button = tkinter.Button(root,text="Click me!",command=say_helloWorld)
button.pack()

root.mainloop()
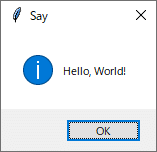
実行すると下記ウインドウが表示される。
python tkinter_sample.py
手順 : [Click me!]ボタンを押下する
→ say_helloWorld()が実行され、MessageBoxが表示される。
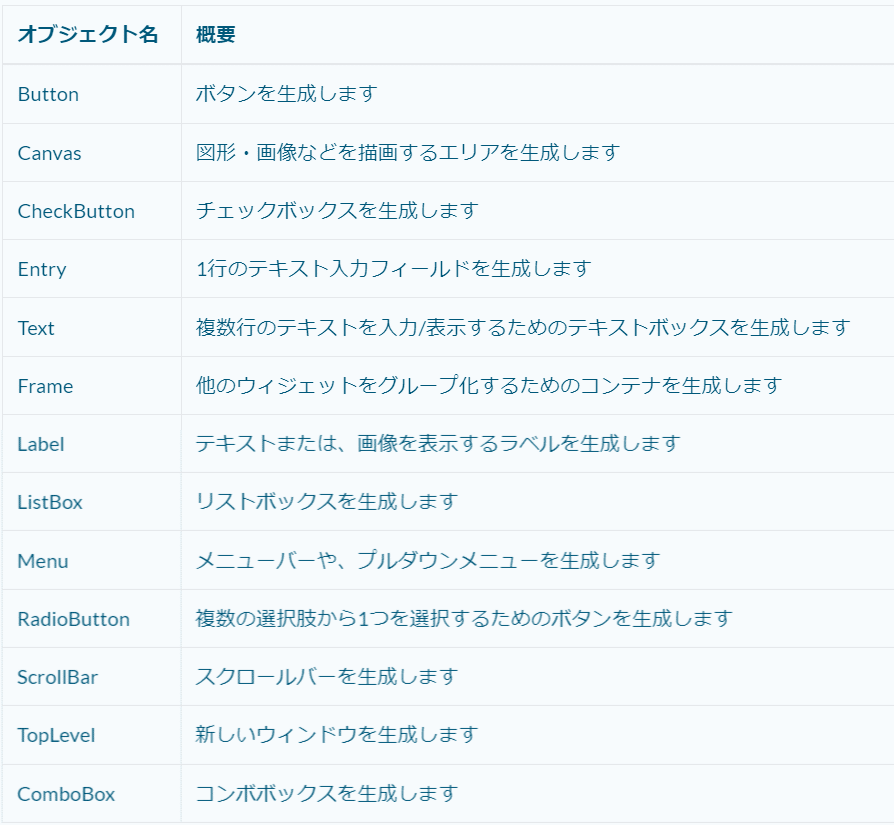
Tkinterの各オブジェクト一覧
ボタンや、メッセージボックス以外のもTkinterには、GUIの基本的なオブジェクトが用意されています。今回は、基本的なオブジェクトを紹介します
Button
# Button
button = tk.Button(root,text="Button",command=func.msg)
button.pack()
Canvas
# Canvas
canvas = tk.Canvas(root,width=50,height=50)
canvas.pack()
CheckButton
# CheckButton
var = tk.IntVar()
check_button = tk.CheckButton(root,text="CheckButton",variable=var)
check_button.pack()
Entry
# Entry
entry = tk.Entry(root)
entry.pack()
Text
# Text
entry = tk.Text(root)
entry.pack()
Frame
# Frame
frame = tk.Frame(root, width=200, height=100,borderwidth=10)
frame.pack()
Label
# Label
label = tk.Label(root,text="Label Name")
label.pack()
ListBox
# ListBox
list_box = tk.Listbox(root)
list_box.insert(1,"Item_1")
list_box.pack()
Menu
# Menu
menu = tk.Menu(root)
root.config(menu=menu)
file_menu = tk.Menu(menu)
menu.add_cascade(label="File",menu=file_name)
RadioButton
# RadioButton
var = tk.IntVar()
radio_Button = tk.RadioButton(root,text="Option 1" , variable=var,value=1)
radio_Button.pack()
ScrollBar
# ScrollBar
scroll_bar = tk.Scrollbar(root)
scroll_bar.pack(side=tk.RIGHT,fill=tk.Y)
TopLevel
# TopLevel
top = tk.TopLevel()
top.title("New Widow")
ComboBox
import tkinter.ttk as ttk
# ComboBox
comboBox = ttk.Combobox(root,value=["apple","orange","remon"])
comboBox.pack()
・応用(画像差異ツールの作成について)
上記以外にも、Tkinterには様々な機能があり、 Tkinterを使用することで、多様なGUIツールを作成することができます。
ここでは一例として、Playwright(自動テストツール)を実行した結果の画像比較/更新ツールを作成しました。
機能概要:
下記機能を実装する
「Playwrightでの画像比較失敗箇所を一覧化すること」
「期待画像と結果画像の確認を行えること」
「結果画像を期待画像に上書き更新できること」
画像格納フォルダ:

ソースコード:
main.py
#-*- coding: utf8 -*-
import tkinter as tk
from object import ImageComparisonTool

def main():
    root = tk.Tk()
    ImageComparisonTool(root)
    root.mainloop()

if __name__ == "__main__":
    main()
object.py
#-*- coding: utf8 -*-
import tkinter as tk
import func
#pip install opencv-python
import cv2
import os

EXP = False
ACT = True

class ImageComparisonTool:
    def __init__(self,root):

        self.root = root
        self.root.title("Image Comparison Tool")

        # Expect Frame
        self.expect_frame = tk.Frame(self.root)
        self.expect_frame.pack(expand=True,fill='x',padx=20)

        # Expect Frame - Expect Label
        self.expect_label = tk.Label(self.expect_frame,text="EXP : ")
        self.expect_label.pack(side=tk.LEFT)

        # Expect Frame - Expect Image Folder Path
        self.expect_folder_path_entry = tk.Entry(self.expect_frame)
        self.expect_folder_path_entry.pack(expand=True,fill='x',side=tk.RIGHT)

        # Actual Frame
        self.actual_frame = tk.Frame(self.root)
        self.actual_frame.pack(expand=True,fill='x',padx=20)

        # Actual Frame - Actual Label
        self.actual_label = tk.Label(self.actual_frame,text="ACT : ")
        self.actual_label.pack(side=tk.LEFT)

        # Actual Frame - Actual Image Folder Path
        self.actual_folder_path_entry = tk.Entry(self.actual_frame)
        self.actual_folder_path_entry.pack(expand=True,fill='x',side=tk.RIGHT)

        # 実行ボタン
        self.execute_button = tk.Button(self.root,text="Execute",command=self.execute_comparison)
        self.execute_button.pack(pady=10)

        self.result_listbox = tk.Listbox(self.root)
        self.result_listbox.bind("<Double-Button-1>", self.create_image_differ)
        self.result_listbox.pack(expand=True,fill='both',padx=20,pady=20)

    def execute_comparison(self):
        expect_folder_path = self.expect_folder_path_entry.get()
        actual_folder_path = self.actual_folder_path_entry.get()
        error_files = func.compare_images(expect_folder_path,actual_folder_path)
        self.result_listbox.delete(0,tk.END)
        for file in error_files:
            self.result_listbox.insert(tk.END,file)

    def create_image_differ(self,event):
        # get path
        self.result_listbox.selection_clear(0,tk.END)
        self.result_listbox.selection_set(self.result_listbox.nearest(event.y))
        self.result_listbox.activate(self.result_listbox.nearest(event.y))
        index = self.result_listbox.curselection()[0]
        self.current_actual_path = f'{self.actual_folder_path_entry.get()}/{self.result_listbox.get(index)}'
        self.current_expect_path = f'{self.expect_folder_path_entry.get()}/{func.convert_expectimg_name(self.result_listbox.get(index))}'
        ImageDiffer(self)

class ImageDiffer:
        def __init__(self,image_conparison_tool):
            # new window
            top = tk.Toplevel()
            top.title("image differ")
            # canvas
            self.topCanvasFrame = tk.Frame(top)
            self.topCanvasFrame.pack(side=tk.LEFT)

            h,w,c = cv2.imread(image_conparison_tool.current_actual_path).shape
            image_tk = func.create_image_tk(image_conparison_tool.current_actual_path)

            self.topCanvas = tk.Canvas(self.topCanvasFrame,width=w/2,height=h/2)
            self.topCanvas.pack(padx=10,pady=10)
            self.image_flg = ACT
            self.item = self.topCanvas.create_image(0, 0, image=image_tk, anchor='nw')

            self.topButtonFrame = tk.Frame(top)
            self.topButtonFrame.pack(side=tk.RIGHT)

            topExpectBtn = tk.Button(self.topButtonFrame,text="DIFF",command=lambda: self.diff_image(image_conparison_tool))
            topExpectBtn.pack(padx=10,pady=10)

            topActualBtn = tk.Button(self.topButtonFrame,text="ACT",command=lambda: self.change_image(image_conparison_tool,ACT))
            topActualBtn.pack(padx=10,pady=10)

            topExpectBtn = tk.Button(self.topButtonFrame,text="EXP",command=lambda: self.change_image(image_conparison_tool,EXP))
            topExpectBtn.pack(padx=10,pady=10)

            topUpdateBtn = tk.Button(self.topButtonFrame,text="UPDATE",command=lambda: self.update_image(image_conparison_tool))
            topUpdateBtn.pack(padx=10,pady=10)

            top.mainloop()

        def change_image(self,image_conparison_tool,flg):
            self.topCanvas.after_cancel(id)
            if flg:
                # get current text
                self.image_flg = flg
                self.actual_image_tk = func.create_image_tk( image_conparison_tool.current_actual_path)
                self.topCanvas.itemconfig(self.item ,image=self.actual_image_tk)
                self.topCanvas.update()
            else:
                # get current text
                self.image_flg = flg
                self.expect_image_tk = func.create_image_tk( image_conparison_tool.current_expect_path)
                self.topCanvas.itemconfig(self.item ,image=self.expect_image_tk)
                self.topCanvas.update()

        def diff_image(self,image_conparison_tool):
            global id
            if  self.image_flg == ACT :
                self.image_flg = EXP
            else:
                self.image_flg = ACT
            self.change_image(image_conparison_tool,self.image_flg)
            id = self.topCanvas.after(1000,self.diff_image,image_conparison_tool)

        def update_image(self,image_conparison_tool):
            # Override actual image To Expect Image
            self.backup_path = func.update_image(image_conparison_tool.current_actual_path,image_conparison_tool.current_expect_path)
            self.change_image(image_conparison_tool,ACT)
            self.topUpdateBtn = tk.Button(self.topButtonFrame,text="UNDO",command=lambda : self.undo_image(image_conparison_tool))
            self.topUpdateBtn.pack(padx=10,pady=10)

        def undo_image(self,image_conparison_tool):
            func.undo_image(os.path.dirname(image_conparison_tool.current_expect_path),self.backup_path)
            self.change_image(image_conparison_tool,EXP)
            self.topUpdateBtn.destroy()
func.py
#-*- coding: utf8 -*-
import os
import re
#pip install opencv-python
import cv2
#pip install pillow
from PIL import Image, ImageTk
import shutil

def compare_images(expect_folder_path,actual_folder_path):
    expect_image_files = []
    # Expect Folder Search for jpeg or png
    for expfile in os.listdir(expect_folder_path):
        if expfile.endswith(".jpeg") or expfile.endswith(".png"):
            expect_image_files.append(expfile)
    actual_image_files = []
    # Actual Folder Search for
    for actfile in os.listdir(actual_folder_path):
        expfile = convert_expectimg_name(actfile) # Delete "-actual"
        if expfile in expect_image_files :
            actual_image_files.append(actfile)
    return actual_image_files

def convert_expectimg_name(actualimg_path):
    expectimg_path = re.sub(r'-actual(\.png|\.jpeg)',"-win32\\1",actualimg_path) # Delete "-actual"
    return expectimg_path

def convert_actualimg_name(expectimg_path):
    actualimg_path = re.sub(r'-win32(\.png|\.jpeg)',"-actual\\1",expectimg_path) # Add "-actual"
    return actualimg_path

def create_image_tk(image_path):
    image_bgr = cv2.imread(image_path)
    image_bgr = cv2.resize(image_bgr,dsize=None,fx=0.5,fy=0.5)
    image_rgb = cv2.cvtColor(image_bgr, cv2.COLOR_BGR2RGB)
    image_pil = Image.fromarray(image_rgb)
    image_tk = ImageTk.PhotoImage(image_pil)
    return image_tk

def update_image(actual_path,expect_path):
    backup_folder = f'{os.path.dirname(__file__)}/backup'
    backup_path = f'{backup_folder}/{os.path.basename(expect_path)}'
    os.makedirs(backup_folder,exist_ok=True) # create backup folder
    shutil.copy2(expect_path,backup_folder) # backup
    shutil.copy2(actual_path,expect_path) # override
    return backup_path

def undo_image(expect_path,backup_path):
    shutil.copy2(backup_path,expect_path) # override
    os.remove(backup_path) # remove backup
作成したGUIツールの使い方
1. 下記コマンドを実行する
python main.py2. 起動時
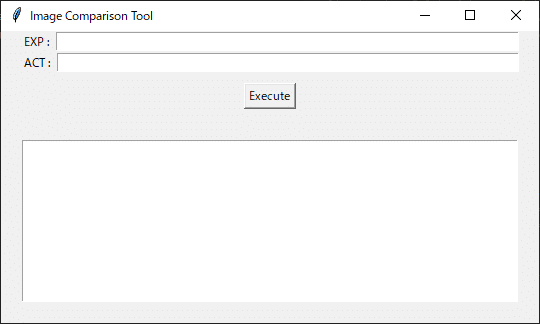
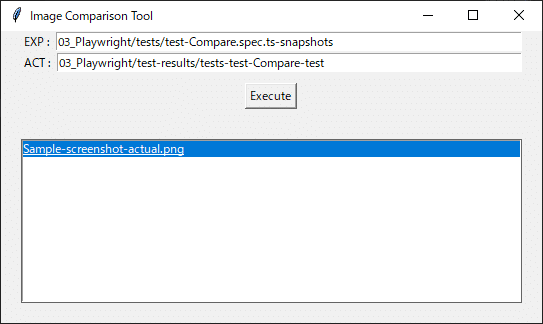
3. Path入力後、[Execute]ボタン押下し、リストに表示されたファイル名をダブルクリック
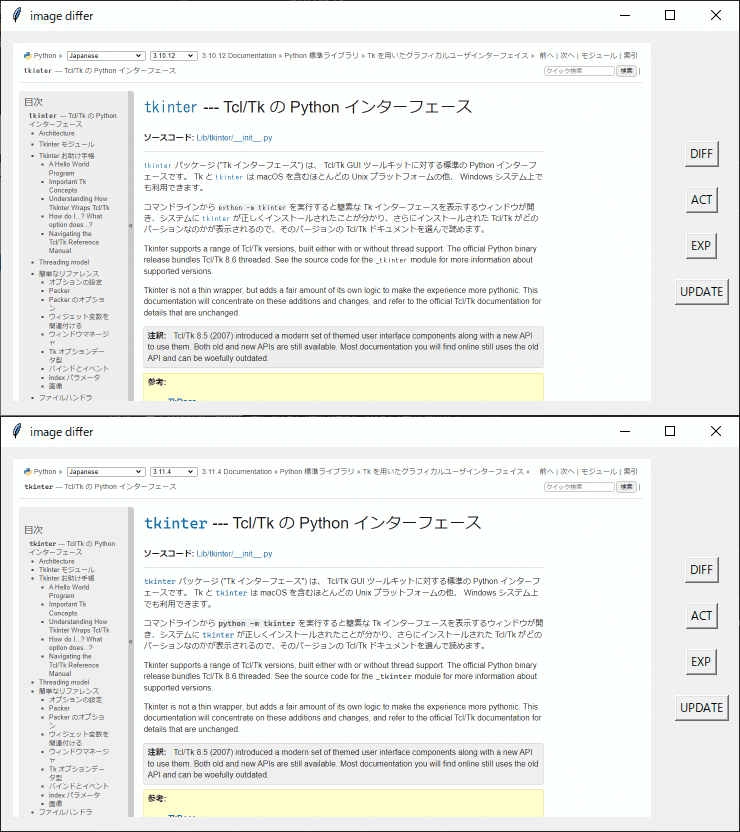
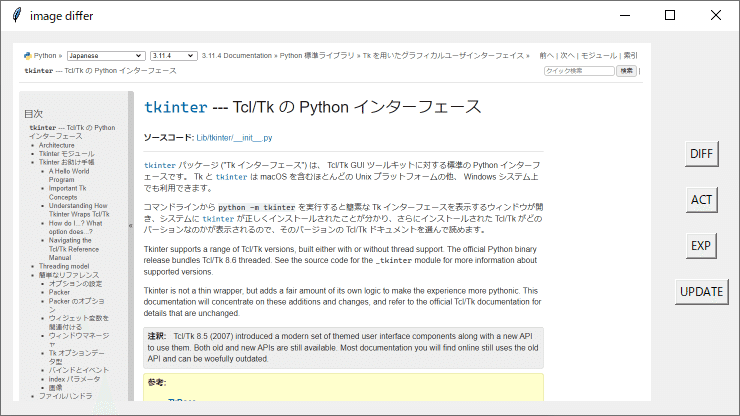
4. 新規ウインドウが立ち上がり、期待画像と結果画像が1000ms毎に表示される(Python Tkinterページの「version: 3.11.4」「version: 3.10.12」のレイアウト差分が確認できる。)
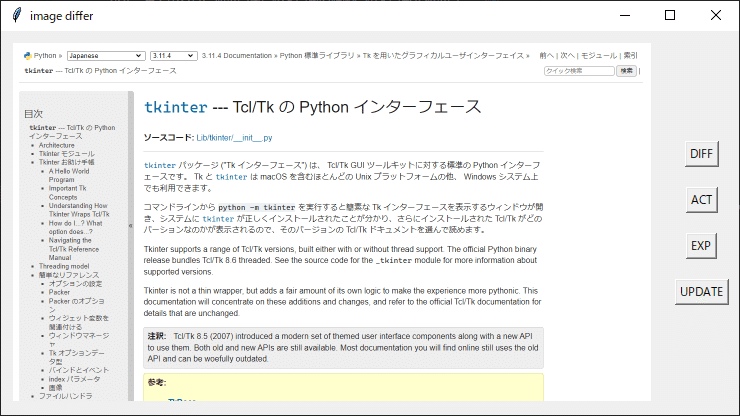
5. 止めたい場合は、[ACT] or [EXP]ボタンを押下で止める
6. [Update]ボタンを押すと、結果画像を期待画像に上書き(期待画像の更新)して、[Undo]ボタンが表示される。
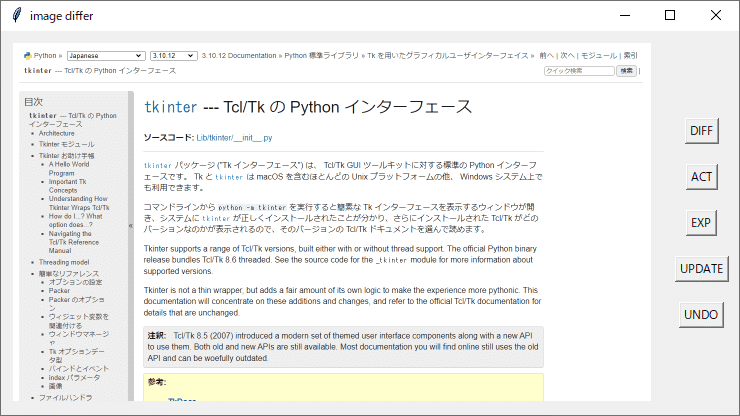
7. 戻したいときは[Undo]ボタンを押下する。※[Undo]ボタンは削除される。
最後に
Playwright等の自動テストツールでは、テストの失敗箇所・差分の情報をレポートにまとめて確認することは可能ですが、仕様変更等の意図された画像差分である可能性もあるため、「差分の確認」「期待画像の更新」作業は手動で行う必要があります。
(自動で更新すると、未確認のUIの変更が意図せずに受け入れられてしまう可能性があるため)
今回の応用例では、自動テスト実行後の期待画像の更新作業をより、少ない労力で行うことができるようになります。
こういった日々の小さな作業をどんどん効率化していきたいですね。
参照
tkinter --- Tcl/Tk の Python インターフェース¶ https://docs.python.org/ja/3/library/tkinter.html#module-tkinter
執筆者プロフィール:荻野 善祥
新卒で某Slerで、組込機器の自動テスト開発/運用を経験後、SHIFTへ入社。
入社後は、Webの自動テスト開発/運用に日々、奮闘中。
めんどくさがりのため、仕事や家庭でも、自動化・効率化を推進している。
モットーは、「あとは機械にお任せ」。
お問合せはお気軽に
https://service.shiftinc.jp/contact/
SHIFTについて(コーポレートサイト)
https://www.shiftinc.jp/
SHIFTのサービスについて(サービスサイト)
https://service.shiftinc.jp/
SHIFTの導入事例
https://service.shiftinc.jp/case/
お役立ち資料はこちら
https://service.shiftinc.jp/resources/
SHIFTの採用情報はこちら
https://recruit.shiftinc.jp/career/

