Officeファイル保護を自分で実装してみる Part2.MIPローレベルファイル保護実装編
はじめに
こんにちは、SHIFTの秋吉です。
この記事では、MIP (Microsoft Information Protection) を利用した、
Officeファイルの保護を行うプログラムの実装方法を軸に、付随する MSAL (Microsoft Authentication Library) の使用方法や、AAD (Azure Active Directory) の利用方法(アプリケーションの登録方法)について説明します。
Part2 では、Part1 で紹介したサンプルコードに手を加えて、機密"ラベル"
を使用せずに、権限を与えるユーザーと権限内容を "ベタ" で明示したファイル保護のやり方について説明します。
この記事でわかること
MIP SDK を使用して、「機密ラベル」を使用しない、独自保護(暗号化)を行う方法
特定のユーザー、グループ指定でなく、ある組織に属する(=ある AAD テナントに属する)ユーザー全員("everyone" イメージ) に権限を付与する方法
以下は、Part1で説明した内容になります。
認証を行うための AAD へのアプリケーション登録手順
MIP API を使うための API アクセス許可の設定手順
トークン キャッシュの実装方法と注意点
前提環境
Part1 でのプログラムが動作していることを前提に説明します。
ラベルを使用しない、権限明示のファイル保護を実装する
まず、今回のメインであるファイル保護をかけるロジックを、Action.cs に追加します。
  public bool SetProtect(FileOptions options)
        {
            var handler = CreateFileHandler(options);

            // Create a List<string> of the first set of permissions.
            List<string> users = new List<string>()
            {
                "ANYONE",
                "AllStaff-7184AB3F-CCD1-46F3-8233-3E09E9CF0E66@contoso.com"
            };

            // Create a List<string> of the Rights the above users should have.
            List<string> rights = new List<string>()
            {
                Rights.View,
                "OBJMODEL"       // マクロ操作
            };

            // Create a UserRights object containing the defined users and rights.
            UserRights userRights = new UserRights(users, rights);

            // Add them to a new List<UserRights>
            List<UserRights> userRightsList = new List<UserRights>()
            {
                userRights
            };

            // Create a ProtectionDescriptor using the set of UserRights.
            var prtctDesc = new ProtectionDescriptor(userRightsList);

            // Use the SetProtection method on the handler, Users, Rights and new ProtectionSettings
            // The handler already references a file, so those details aren't needed.
            handler.SetProtection(prtctDesc, new ProtectionSettings());

            // The change isn't committed to the file referenced by the handler until CommitAsync() is called.
            // Pass the desired output file name in to the CommitAsync() function.
            bool result = false;
            if (handler.IsModified())
            {
                // Returns true if any changes were made. False if nothing was changed.
                result = Task.Run(async () => await handler.CommitAsync(options.OutputName)).Result;
            }

            return result;
        }
実装内容は、ユーザー(グループ)のメールアドレスと、許可する権限の組み合わせを作って、SetProtection() しているだけのシンプルなものです。
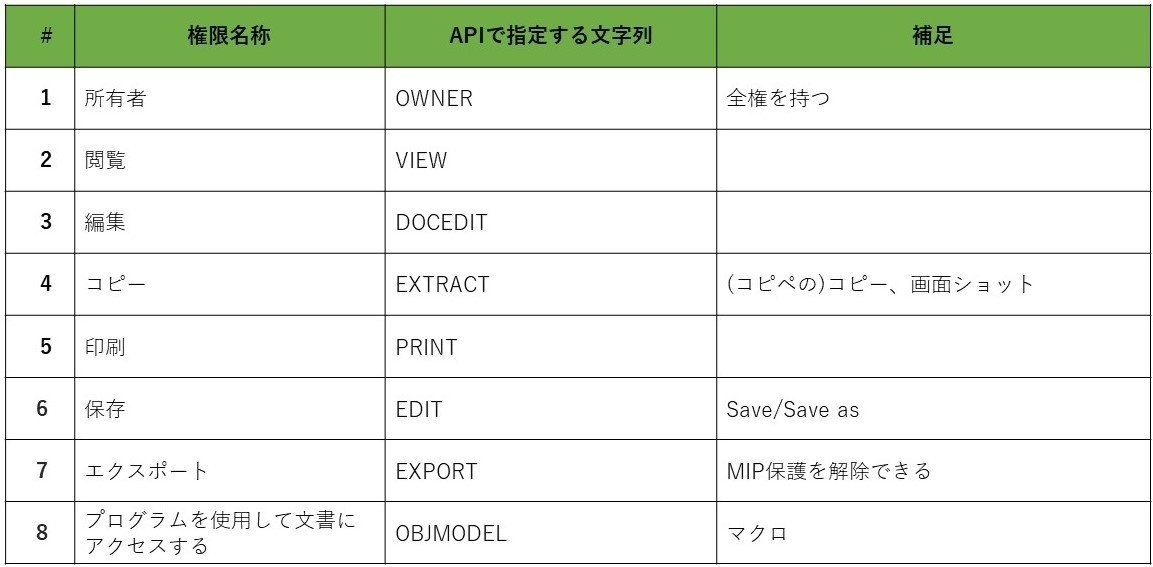
MIPによるファイル保護では、対象のユーザー(グループでも可)と許可する動作のセットで指定します。 許可する動作には次の種類があります。

たとえば、 「AさんとBグループには編集権限と保存権限を付与」 「Cグループには、閲覧権限のみ付与」 といった、対象のユーザーと許可する動作のセットで指定します。ちなみに、ユーザーまたはグループは、メールアドレスで指定しますが、これは、AADで管理されているものであれば、自分の組織外(自分の属するAADテナント外)のユーザー、グループも指定することができます。
また、ここで指定する "Rights文字列" は、一部 "そのまま" でないものがあることにも注意してください。 たとえば、「保存」を許可する場合、"SAVE" でなく "EDIT" を指定します。じゃぁ、ファイル内容の「編集」を許可する場合はというと、"DOCEDIT" を指定します。
汎用的なプログラムを作成する場合は、これらの権限情報は、プログラムの外から渡せるようにしますが、この記事では、権限許可の指定方法の例示が目的のため、コード中にハードコーデイングしています。
上記コードには、もう一つ Tips が含まれています。それは、ある組織(あるAADテナント)に属する「全員」に許可を与える場合の指定方法です。
自組織(自分の属するAADテナント)の全員に許可する場合は、"ANYONE" と指定します 。
自分の属するAADテナントでない別のAADテナントの全員を指定する場合には、次のように対象とするドメインの前に "AllStaff-7184AB3F-CCD1-46F3-8233-3E09E9CF0E66" を指定します。これは固定文字列です。
                                                                               アドレス例
AllStaff-7184AB3F-CCD1-46F3-8233-3E09E9CF0E66@contoso.com
動作確認
では、プログラムを動作させてみましょう。 Program.cs の Main() を以下のように、シンプルに上記の SetProtect() を呼ぶように改造します。
 static void Main(string[] args)
        {
            // Create ApplicationInfo, setting the clientID from Azure AD App Registration as the ApplicationId
            // If any of these values are not set API throws BadInputException.
            ApplicationInfo appInfo = new ApplicationInfo()
            {
                // ApplicationId should ideally be set to the same ClientId found in the Azure AD App Registration.
                // This ensures that the clientID in AAD matches the AppId reported in AIP Analytics.
                ApplicationId = clientId,
                ApplicationName = appName,
                ApplicationVersion = appVersion
            };

            // Initialize Action class, passing in AppInfo.
            Action action = new Action(appInfo);

            // Prompt for path inputs
            Console.Write("Enter an input file path: ");
            string inputFilePath = Console.ReadLine();
            char[] trimChars = { ' ', '\t', '"', '\'' };
            inputFilePath = inputFilePath.Trim(trimChars);

            Console.Write("Enter an output file path: ");
            string outputFilePath = Console.ReadLine();
            outputFilePath = outputFilePath.Trim(trimChars);

            // Set file options from FileOptions struct. Used to set various parameters for FileHandler
            Action.FileOptions options = new Action.FileOptions
            {
                FileName = inputFilePath,
                OutputName = outputFilePath,
                ActionSource = ActionSource.Manual,
                AssignmentMethod = AssignmentMethod.Standard,
                DataState = DataState.Rest,
                GenerateChangeAuditEvent = true,
                IsAuditDiscoveryEnabled = true,
                //LabelId = labelId,    // remove label code
                EnableDocTracking = false,
                NotifyOwnerOnOpen = false
            };

            // Set protection, commit change to outputfile.
            bool result = action.SetProtect(options);
            if (!result)
            {
                Console.WriteLine("No changes required for file.");
            }

            Console.WriteLine("Press a key to quit.");
            Console.ReadKey();
        }
ビルドして、実際に Office のファイル(Word/Excel/PowerPoint)をMIP 保護してみましょう。そして、そのファイルを、Office で開いてみて、保護がされていることを確認しましょう。
その他補足説明
"所有者" は絶対権力者!
ドキュメントの作成者(= MIP 保護をかけたアカウント、この記事で紹介した独自プログラムにサインインしたアカウント)は、特に明示的に "OWNER" を指定しなくても、暗黙の "所有者" になります。
MIP 保護において、所有者は全権を持ちます。MIP 保護の解除を含め、すべてのことができます。
このサンプルプルプログラムのように、それぞれの使用者でサインインする場合は問題ありませんが、使用者によらず、特定の管理者アカウントや、プログラムアカウント、サービスアカウントで動作する場合には注意が必要です。そのプログラムで MIP 保護を設定したファイルは、プログラムを使用するユーザーに MIP の権限が付与されていなくても、マスター キー的にファイルの閲覧その他すべてのことが(保護を解除して素のファイルに戻すことも)できるからです。
実は Office のファイルでなくても保護可能
今回使用した、MIP の SetProtection() は、実は、Officeのファイルだけでなく、あらゆるファイルを暗号化、保護してくれます。PDFはもちろん、テキストファイルでも、画像、動画でも、ZIP圧縮ファイルでもあらゆるファイルで可能です。
ただし、マイクロソフト Office と Adobe Acrobat Reader 以外は、「参照は許すが、コピーや印刷は不可」といった細かい権限付き動作をしてくれるアプリがないため、保護される権限は、全く何もできないか、フルコントロールかの二択になります。
それでも、パスワードを知っているか否かではなく特定の対象者限定でファイルを配布できるのと、パスワードを共有する必要はない、という利点のある暗号化書庫として使うことができます。機会があれば、MIPファイル保護解除ツールについても書いてみたいと思います。(Part3 ?)
参考
Microsoft Information Protection SDK - ユーザー定義のアクセス許可
この記事で紹介している "AllStaff- ~" の記載もあります。Microsoft Information Protection SDK のドキュメント
Microsoft Information Protection SDK のドキュメント - チュートリアル、API リファレンス
《この公式ブロガーの関連記事》
執筆者プロフィール:秋吉 利彰
"IT" と呼ばれる前から、この業界に身を置き早やうん十年。
PC 上で動作するニッチなプログラミングから クラウド (Azure) でのアーキテクチャまで、これまでの経験で得られた、Tipsや "てみた" 的な記事を書いていこうと思います。
お問合せはお気軽に
https://service.shiftinc.jp/contact/
SHIFTについて(コーポレートサイト)
https://www.shiftinc.jp/
SHIFTのサービスについて(サービスサイト)
https://service.shiftinc.jp/
SHIFTの導入事例
https://service.shiftinc.jp/case/
お役立ち資料はこちら
https://service.shiftinc.jp/resources/
SHIFTの採用情報はこちら
https://recruit.shiftinc.jp/career/
PHOTO:UnsplashのSalman Sidheek

