【IaCで作るselenium環境】08_AzureVMをPackerでイメージにする
直近の関連エントリ
――――――――――――――――――――――――――――――――――
こんにちは。SHIFTのスクラムマスター・テスト自動化エンジニアの石丸です。
前回、AzureVM部分をTerraformに代替しました。
今回はここをもう少し踏み込んでカイゼンします。
■今回のテーマ
今回のテーマは「Packerでイメージの準備」です。
Azureでは「イメージ」というリソースがありますが、これはAWSでいうところのAMIにあたります。
テスト環境のようなVMを作成するのに、毎回Ansibleでプロビジョニングかけるのは手間なので、事前にイメージを準備します。
これをPackerを使って準備していきましょう。
■前提
・windows環境での構築
・第7回までの内容が作業済みであること
■前回のおさらい
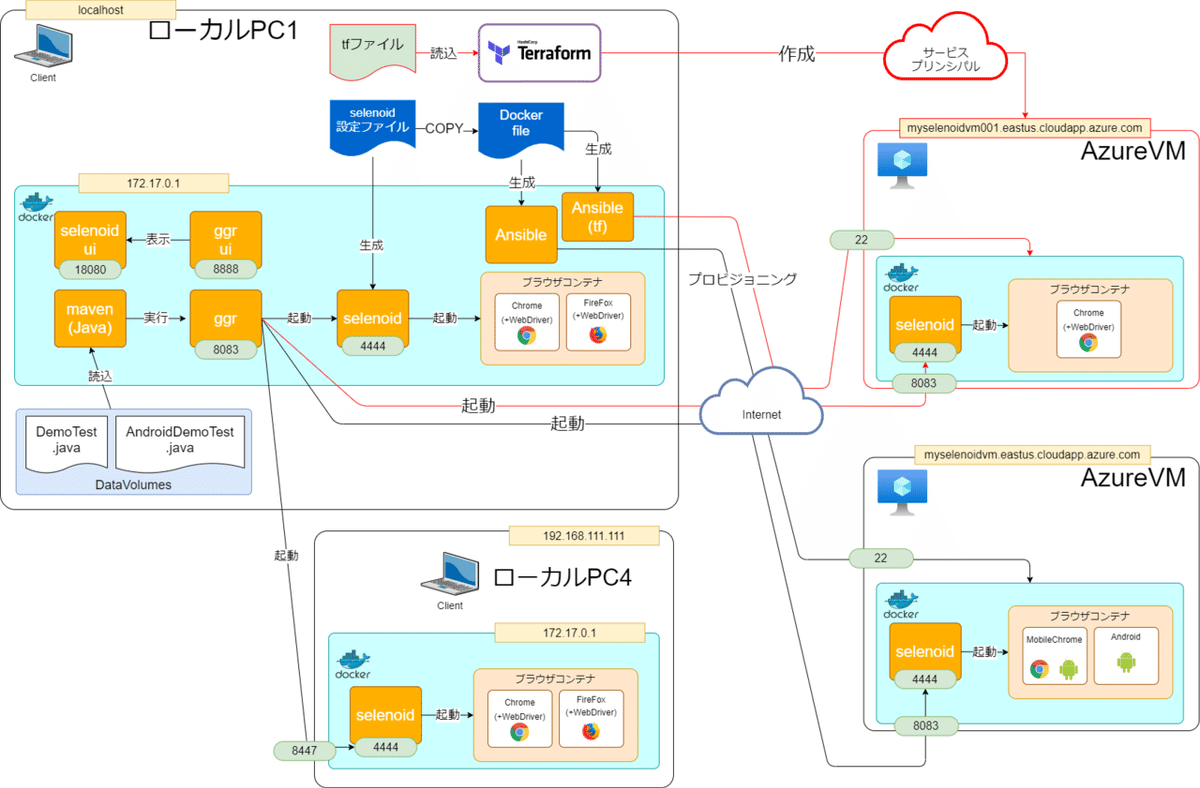
前回の最後はこんな感じでした。

TerraformからVM環境の構築し、あとからAnsibleでプロビジョニングするようになっています。
■Packerって?
通常、まっさらなVMにプロビジョニングを施していては時間がかかり過ぎます。
そこで「これを使えばすぐに動くよ」というテンプレート環境をイメージとして事前に準備しておき、実際に構築する時にはこちらを適用して作成します。これをゴールデンイメージと呼びます。
Pakcerを使うことにより、プロビジョニング済みのVMゴールデンイメージが出来上がります。
これで何がうれしいかというと、すぐに動くVMの作成がイメージから簡単にできてしまうのです。
■フォルダ構成
今回もちょっとファイルの構成がややこしいので、ファイルの構成を整理します。(太字が新規作成分)
・ローカルPC1
C:
|ーUsers
| |ー<ユーザフォルダ>
| |ー.ssh
| |ーid_rsa.pub(第7回で生成したSSH公開鍵)
|
|ーtmp
|ーterraform
|ーselenoid_normal.tf(第7回で準備)
|ーterraform_vmimage
|ーselenoid_vmimage.tf
|ーvariables.tf
|ーansible(場所は任意)
|ーDockerfile
|ーDockerfile_packer
|ーpacker_node.json
|ーhosts
|ーplaybook_node.yml
|ーansible.cfg
|ーselenoid(第1回で作成したフォルダのコピー)
|ーdocker-compose.yml
|ーconfig
|ーbrowsers.json
今回専用のTerraformファイルを用意しますが、tfファイルは既存のtfファイルと同一フォルダに配置するとマズいので、専用フォルダとしてvmimageを準備します。
■Packerの準備
今回準備するPackerには以下の機能を担ってもらいます。
①どこにどのようなイメージを作成するのか(builders句)
②イメージの中身はどのような設定にするのか(provisioners句)
これらをjsonファイルとして用意することになるのですが、
実はprovisioners句にはAnsibleのplaybookがそのまま利用可能です。
なので第5回で準備したplaybookをそのまま流用します。
ただしplaybookを流用するということはAnsibleコンテナ内からPackerを実行する必要がある、という制約が発生することになります。
これらを踏まえて手順が全部で5つあります。
手順1:packer_node.jsonの準備
packerの設定ファイルを準備します。
packer_node.json
{
 "variables":{
   "client_id": "{{env `ARM_CLIENT_ID`}}",
   "client_secret": "{{env `ARM_CLIENT_SECRET`}}",
   "subscription_id": "{{env `ARM_SUBSCRIPTION_ID`}}",
   "tenant_id": "{{env `ARM_TENANT_ID`}}"
 },
 "builders":[{
   "type": "azure-arm",
   "client_id": "{{user `client_id`}}",
   "client_secret": "{{user `client_secret`}}",
   "subscription_id": "{{user `subscription_id`}}",
   "tenant_id": "{{user `tenant_id`}}",
   "managed_image_resource_group_name": "tfrg2",
   "managed_image_name": "selenoidImage",
   "os_type": "Linux",
   "image_publisher": "Canonical",
   "image_offer": "UbuntuServer",
   "image_sku": "18.04-LTS",
   "azure_tags": {
       "environment": "TerraformVmImage"
   },
   "location": "eastus",
   "vm_size": "Standard_F2"
 }],
 "provisioners":[{
   "type": "ansible",
   "playbook_file": "playbook_node.yml"
  }]
}
記述を見て頂くとお分かりになりますが
・variables句
・builders句
・priovisioners句
があることが確認できます。
ポイントは2つ。
variables句は、今回サービスプリンシパル情報を受け渡す役割があります。
provisioners句は、playbookの指定をする役割を持たせます。
ただしhostsは不要です。
手順2:Dockerfileの作成
以前準備したDockerfileと大幅に記述が変わってしまうので、コピーして別ファイルを用意しましょう。
Dockerfile_packer
# syntax = docker/dockerfile:1.1-experimental
FROM alpine:3.12.1

RUN adduser -S azureuser root

RUN set -x \
   && apk add --no-cache \
     sudo \
     bash \
     wget \
     python3 \
     py3-pip \
     openssh-client

RUN apk add --no-cache ansible

RUN set -x \
 && mkdir -p /etc/ansible/selenoid \
 && mkdir -p -m 0700 /root/.ssh/ \
 && wget https://releases.hashicorp.com/packer/1.6.6/packer_1.6.6_linux_amd64.zip \
 && unzip packer_1.6.6_linux_amd64.zip \
 && mv packer /usr/bin

COPY playbook_node.yml /etc/ansible
COPY ansible.cfg /etc/ansible
COPY ./selenoid /etc/ansible/selenoid
COPY packer_node.json /etc/ansible

WORKDIR /etc/ansible

USER azureuser

#CMD ["packer", "inspect", "packer_node.json"]
#CMD ["packer", "validate", "packer_node.json"]
CMD ["packer", "build", "packer_node.json"]
大きな変更点は以下です。
・VMへsshする必要がなくなったので該当箇所を全体的に削除
・Packerをwgetして解凍、binディレクトリ配下にコピー
・packer_node.jsonをansibleディレクトリへコピー
・Ansibleコマンドの変わりにPackerコマンドへ変更
手順3:Terraformファイルの準備
こちらも新規に用意しますが、今回少しだけリファクタリングして最適化しましょう。
variables.tf
variable "location" {
 description = "リージョン"
 default     = "eastus"
}

variable "tags" {
 description = "タグ情報"
 type        = map
 default = {
   environment  = "TerraformVmImage"
 }
}

variable "domain_name_label"{
   description = "DNS名"
   default   = "myselenoidvm001"
}

variable "selenoid_port_01" {
 description = "使用ポート"
 default     = 8083
}
tf内で複数利用するものや、書き換えが発生しそうなものをvariablesとして外出しします。
selenoid_vmimage.tf
provider "azurerm" {
 # The "feature" block is required for AzureRM provider 2.x.
 # If you are using version 1.x, the "features" block is not allowed.
 version = "=2.40.0"
 features {}
}

# Azure 接続とリソース グループを作成する
resource "azurerm_resource_group" "tfrg" {
 name     = "tfrg2"
 location = var.location
 tags     = var.tags
}

# 仮想ネットワークの作成
resource "azurerm_virtual_network" "tfrgVnet" {
 name                = "tfrgVnet"
 address_space       = ["10.0.0.0/16"]
 location            = azurerm_resource_group.tfrg.location
 resource_group_name = azurerm_resource_group.tfrg.name
 tags     = var.tags
}

# サブネットの設定
resource "azurerm_subnet" "tfsubnet" {
 name                 = "tfrgSubnet"
 resource_group_name  = azurerm_resource_group.tfrg.name
 virtual_network_name = azurerm_virtual_network.tfrgVnet.name
 address_prefix       = "10.0.3.0/24"
}

# パブリック IP アドレスの作成
resource "azurerm_public_ip" "tfpublicip01" {
 name                = "tfpublicip01"
 location            = var.location
 resource_group_name = azurerm_resource_group.tfrg.name
 allocation_method   = "Dynamic"
 domain_name_label   = var.domain_name_label
 tags     = var.tags
}

# ネットワーク セキュリティ グループの作成
resource "azurerm_network_security_group" "tfnsg01" {
 name                = "myNetworkSecurityGroup01"
 location            = var.location
 resource_group_name = azurerm_resource_group.tfrg.name

 security_rule {
   name                       = "SSH"
   priority                   = 1001
   direction                  = "Inbound"
   access                     = "Allow"
   protocol                   = "Tcp"
   source_port_range          = "*"
   destination_port_range     = "22"
   source_address_prefix      = "*"
   destination_address_prefix = "*"
 }

 security_rule {
   name                       = "Port_8083"
   priority                   = 1011
   direction                  = "Inbound"
   access                     = "Allow"
   protocol                   = "Tcp"
   source_port_range          = "*"
   destination_port_range     = var.selenoid_port_01
   source_address_prefix      = "*"
   destination_address_prefix = "*"
 }

 security_rule {
   name                       = "Port_5900"
   priority                   = 1021
   direction                  = "Inbound"
   access                     = "Allow"
   protocol                   = "Tcp"
   source_port_range          = "*"
   destination_port_range     = "5900"
   source_address_prefix      = "*"
   destination_address_prefix = "*"
 }

 tags     = var.tags
}

# 仮想ネットワーク インターフェイス カードの作成
resource "azurerm_network_interface" "tfnic01" {
 name                = "tfnic01"
 location            = azurerm_resource_group.tfrg.location
 resource_group_name = azurerm_resource_group.tfrg.name

 ip_configuration {
   name                          = "tfNicConfiguration"
   subnet_id                     = azurerm_subnet.tfsubnet.id
   private_ip_address_allocation = "Dynamic"
   public_ip_address_id          = azurerm_public_ip.tfpublicip01.id
 }

 tags     = var.tags
}

# セキュリティグループインターフェースの作成
resource "azurerm_network_interface_security_group_association" "example01" {
 network_interface_id      = azurerm_network_interface.tfnic01.id
 network_security_group_id = azurerm_network_security_group.tfnsg01.id
}

# VMImageの設定
data "azurerm_resource_group" "image" {
 name = "tfrg2"
}

data "azurerm_image" "image" {
 name                = "selenoidImage"
 resource_group_name = data.azurerm_resource_group.image.name
}

# VM
resource "azurerm_linux_virtual_machine" "tfvm01" {
 name                = var.vm_name
 resource_group_name = azurerm_resource_group.tfrg.name
 location            = azurerm_resource_group.tfrg.location
 size                  = "Standard_F2s"
 disable_password_authentication = true
 admin_username      = "azureuser"
 source_image_id     = data.azurerm_image.image.id

 network_interface_ids = [
   azurerm_network_interface.tfnic01.id,
 ]

 admin_ssh_key {
   username   = "azureuser"
   public_key = file("~/.ssh/id_rsa.pub")
#    public_key = file("${var.public_key}")
#    public_key = var.public_key
 }

 os_disk {
   caching              = "ReadWrite"
   storage_account_type = "Premium_LRS"
 }

 # source_image_reference {
 #   publisher = "Canonical"
 #   offer     = "UbuntuServer"
 #   sku       = "18.04-LTS"
 #   version   = "latest"
 # }

 tags     = var.tags
}

# shutdownスケジュール
resource "azurerm_dev_test_global_vm_shutdown_schedule" "tfvm01sd" {
 virtual_machine_id = azurerm_linux_virtual_machine.tfvm01.id
 location           = azurerm_resource_group.tfrg.location
 enabled            = true
 daily_recurrence_time = "1900"
 timezone              = "Pacific Standard Time"

 notification_settings {
   enabled         = false
 }

}まずvariables.tfで外部参照してる項目は「var.***」に変更しています。
次に大きなポイントとしてイメージの設定を追加しています。
data "azurerm_resource_group"の句とdata "azurerm_image" "image" の句は今回Packerで準備する予定のイメージを指定します。
また併せてVMの中に
source_image_id = data.azurerm_image.image.id
を記述して、代わりにsource_image_referenceはコメントアウトしています。
蛇足で、本当は公開鍵もvariablesで書きだしたかったのですが、${}記述はTerraformのv.0.11までで現在非推奨になっていたので、今回は泣く泣くべた書きです。
手順4:既存VMの削除
以前のものが残っているとわかりづらくなるので、destroyしておきます。
> cd c:\tmp\terraform\
> terraform destroy
destroyのときもapplyと同じように確認が入るので「yes」と入力します。
Do you really want to destroy all resources?
 Terraform will destroy all your managed infrastructure, as shown above.
 There is no undo. Only 'yes' will be accepted to confirm.

 Enter a value:yes

 (中略)

 Destroy complete! Resources: 9 destroyed.
削除できましたね。
==================================================
【注意】
destroyで失敗する場合があります。
Error waiting for update of Network Interface "tfnic01" (Resource Group "tfrg"): Code="InternalServerError" Message="An error occurred." Details=[]上記のようなエラーが出た場合、Azure APIのバグの可能性があるようです。
この場合は、再度apply→destroyを行うか(私はこれで一応うまく行きました)、どうしてもうまくいかない場合は(あんまりIaCっぽくないですが)Azure Portalで直接リソースグループごと削除しましょう。
==================================================
手順5:イメージ格納用リソースグループの準備
さて、準備手順の最後ですがイメージを作る準備として対象のリソースグループを作成します。
ここだけ話がややこしいので、少しだけ説明を入れます。
==================================================今回の作業を時系列を簡単に説明すると以下です。
①イメージを格納するリソースグループ(tfrg2)をTerraformで作成する
②Packer(Ansible)でイメージを作成してtfrg2に格納する
③tfrg2にイメージを基にしてVMをTerraformで作成する
①と③の操作は同じtfファイルでないといけません。
(同一リソースグループに複数tfファイルからアクセスできない)
でも②は①の操作を前提にしないと動きません。
(リソースグループがないのにリソースは作れない)
なのではじめに全記述されたtfファイル(③)を実行しようとするとイメージがない(②)ので当然エラーになってしまいます。
イメージを作ろうとしてもtfファイル(③)を実行しないとなりません。
そこで
・tfファイルのtfrg2部分以外をコメントアウトして一旦terraform applyする
・上記の状態でPackerを実行する
・tfファイルでコメントアウトしていた部分を戻し、再度applyする
という手順を取ります。
前置きが長くなりましたがこの手順5ではまずリソースグループだけ準備するtfファイルを準備し、applyします。
selenoid_vmimage.tf
該当記述以外はコメントアウトしてください(頭に#)
provider "azurerm" {
 # The "feature" block is required for AzureRM provider 2.x.
 # If you are using version 1.x, the "features" block is not allowed.
 version = "=2.40.0"
 features {}
}

# Azure 接続とリソース グループを作成する
resource "azurerm_resource_group" "tfrg" {
 name     = "tfrg2"
 location = var.location
 tags     = var.tags
}

(以下全てコメントアウト)
これでapplyします。
> terraform apply

An execution plan has been generated and is shown below.
Resource actions are indicated with the following symbols:
 + create
Terraform will perform the following actions:
 # azurerm_resource_group.tfrg will be created
 + resource "azurerm_resource_group" "tfrg" {
     + id       = (known after apply)
     + location = "eastus"
     + name     = "tfrg2"
     + tags     = {
         + "environment" = "TerraformVmImage"
       }
   }

Plan: 1 to add, 0 to change, 0 to destroy.

(中略)

Apply complete! Resources: 1 added, 0 changed, 0 destroyed.
これでリソースグループ(tfrg2)のみが作成されました。
■Packerの実行
リソースグループが準備できたら早速Packerを実行しましょう。
まずコンテナイメージを作成します。
> cd c:\tmp\ansible
> docker image build -f Dockerfile_packer -t test01/ansible_packer:0.0.1 --no-cache .

(中略)

 => exporting to image                                                                                                                                                                                         4.3s
=> => exporting layers                                                                                                                                                                                        4.2s
=> => writing image sha256:c93f45cb68cb7e2356bac80b7f45cb515d128b4c1e6673524decbc6750a2d28d                                                                                                                   0.0s
=> => naming to docker.io/test01/ansible_packer:0.0.1
イメージができたらdocker container runします。
ここでポイントなのは、ローカルPC環境変数からAnsibleコンテナを経由してPackerまで受け渡している部分です。
※
サービスプリンシパルが環境変数に登録されていることが前提です。
実行前に今一度「Get-ChildItem env:」をコマンドで打って、当該変数が一覧にあるか確認してください。(第7回参照)
> docker container run -itd -e ARM_CLIENT_ID=$env:ARM_CLIENT_ID -e ARM_CLIENT_SECRET=$env:ARM_CLIENT_SECRET -e ARM_SUBSCRIPTION_ID=$env:ARM_SUBSCRIPTION_ID -e ARM_TENANT_ID=$env:ARM_TENANT_ID --name packer test01/ansible_packer:0.0.1
36aae8eb62b8c8ede4fac73befd09572b5e48f508236f4ea40a2bb371d6d5d40
ログを確認します。
> docker container logs -f packer

azure-arm: output will be in this color.

==> azure-arm: Running builder ...
==> azure-arm: Getting tokens using client secret
==> azure-arm: Getting tokens using client secret
   azure-arm: Creating Azure Resource Manager (ARM) client ...
==> azure-arm: Creating resource group ...
==> azure-arm:  -> ResourceGroupName : 'pkr-Resource-Group-y93qekctwa'
==> azure-arm:  -> Location          : 'eastus'
==> azure-arm:  -> Tags              :
==> azure-arm:  ->> environment : TerraformVmImage
==> azure-arm: Validating deployment template ...
==> azure-arm:  -> ResourceGroupName : 'pkr-Resource-Group-y93qekctwa'
==> azure-arm:  -> DeploymentName    : 'pkrdpy93qekctwa'
==> azure-arm: Deploying deployment template ...
==> azure-arm:  -> ResourceGroupName : 'pkr-Resource-Group-y93qekctwa'
==> azure-arm:  -> DeploymentName    : 'pkrdpy93qekctwa'
==> azure-arm:
==> azure-arm: Getting the VM's IP address ...
==> azure-arm:  -> ResourceGroupName   : 'pkr-Resource-Group-y93qekctwa'
==> azure-arm:  -> PublicIPAddressName : 'pkripy93qekctwa'
==> azure-arm:  -> NicName             : 'pkrniy93qekctwa'
==> azure-arm:  -> Network Connection  : 'PublicEndpoint'
==> azure-arm:  -> IP Address          : '40.76.196.212'

…
まずPackerのBuildersが実行されると、テンポラリーのリソースグループが作成され、これまたテンポラリのVMが作成されます。
ログのつづきを見ましょう。
…

==> azure-arm: Waiting for SSH to become available...
==> azure-arm: Connected to SSH!
==> azure-arm: Provisioning with Ansible...
   azure-arm: Setting up proxy adapter for Ansible....
==> azure-arm: Executing Ansible: ansible-playbook -e packer_build_name="azure-arm" -e packer_builder_type=azure-arm --ssh-extra-args '-o IdentitiesOnly=yes' -e ansible_ssh_private_key_file=/tmp/ansible-key755219092 -i /tmp/packer-provisioner-ansible188585699 /etc/ansible/playbook_node.yml
   azure-arm:
   azure-arm: PLAY [selenoid_VM] *************************************************************
   azure-arm:
   azure-arm: TASK [Gathering Facts] *********************************************************
   azure-arm: [WARNING]: log file at /Users/ishimarukei/ansible_log/ansible.log is not writeable and we cannot create it, aborting
   azure-arm:
   azure-arm: ok: [default]
   azure-arm:
   azure-arm: TASK [Upgrade] *****************************************************************
   azure-arm: ok: [default]

(中略)

    azure-arm: TASK [docker-compose up] *******************************************************
   azure-arm: changed: [default]
   azure-arm:
   azure-arm: PLAY RECAP *********************************************************************
   azure-arm: default                    : ok=15   changed=10   unreachable=0    failed=0    skipped=0    rescued=0    ignored=0
   azure-arm:
==> azure-arm: Querying the machine's properties ...
==> azure-arm:  -> ResourceGroupName : 'pkr-Resource-Group-y93qekctwa'
==> azure-arm:  -> ComputeName       : 'pkrvmy93qekctwa'
==> azure-arm:  -> Managed OS Disk   : '/subscriptions/da145f41-cf12-4f6f-aac8-0737b742d203/resourceGroups/pkr-Resource-Group-y93qekctwa/providers/Microsoft.Compute/disks/pkrosy93qekctwa'
==> azure-arm: Querying the machine's additional disks properties ...
==> azure-arm:  -> ResourceGroupName : 'pkr-Resource-Group-y93qekctwa'
==> azure-arm:  -> ComputeName       : 'pkrvmy93qekctwa'
==> azure-arm: Powering off machine ...
==> azure-arm:  -> ResourceGroupName : 'pkr-Resource-Group-y93qekctwa'
==> azure-arm:  -> ComputeName       : 'pkrvmy93qekctwa'
==> azure-arm: Capturing image ...
==> azure-arm:  -> Compute ResourceGroupName : 'pkr-Resource-Group-y93qekctwa'
==> azure-arm:  -> Compute Name              : 'pkrvmy93qekctwa'
==> azure-arm:  -> Compute Location          : 'eastus'
==> azure-arm:  -> Image ResourceGroupName   : 'tfrg2'
==> azure-arm:  -> Image Name                : 'selenoidImage'
==> azure-arm:  -> Image Location            : 'eastus'
==> azure-arm: Removing the created Deployment object: 'pkrdpy93qekctwa'
==> azure-arm:
==> azure-arm: Cleanup requested, deleting resource group ...
==> azure-arm: Resource group has been deleted.
Build 'azure-arm' finished after 18 minutes 45 seconds.

…
Ansibleの見慣れたログが出てきました。正常に完了しています。
その後テンポラリのリソースグループとVMが削除されています。これらはイメージを作るためだけの一時的なもので、Packerが実行し終えると勝手に削除されます。
ログの最後を確認しましょう。
…

==> Wait completed after 18 minutes 45 seconds

==> Builds finished. The artifacts of successful builds are:
--> azure-arm: Azure.ResourceManagement.VMImage:

OSType: Linux
ManagedImageResourceGroupName: tfrg2
ManagedImageName: selenoidImage
ManagedImageId: /subscriptions/<サブスクリプションID>/resourceGroups/tfrg2/providers/Microsoft.Compute/images/selenoidImage
ManagedImageLocation: eastus
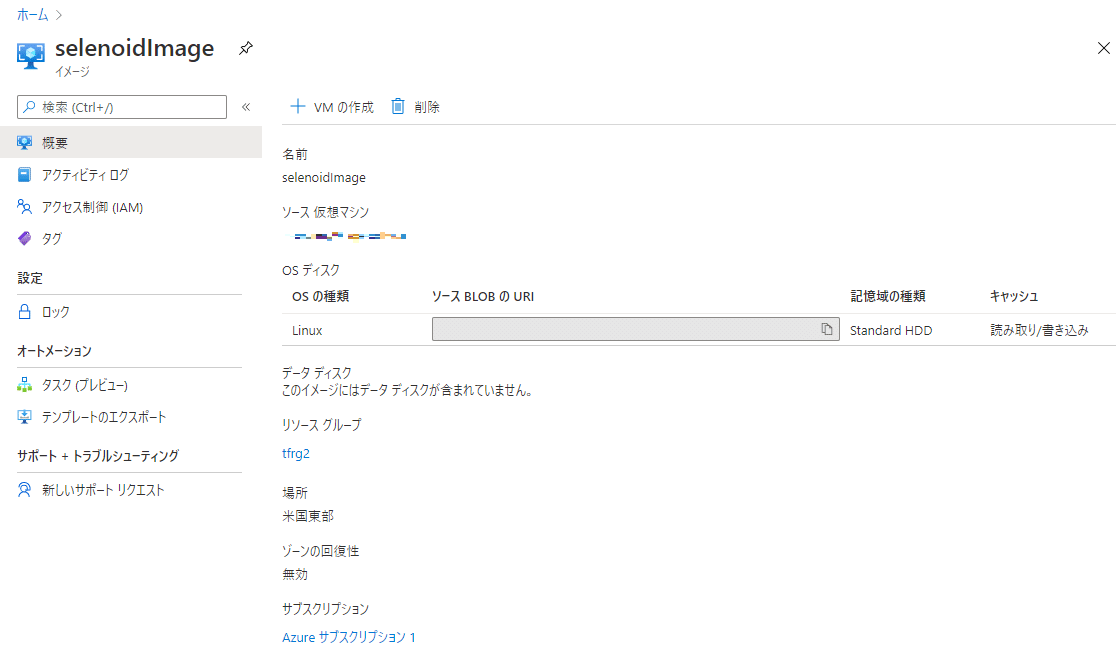
リソースグループ(tfrg2)にイメージ(selenoidImage)ができました。
念のためAzurePortalで確認します。

作成できていますね。
■Terraformファイル(全量)の実行
準備手順の5でコメントアウトした記述を全て元に戻して実行します。
> cd c:\tmp\terraform_vmimage
> terraform apply

(中略)

An execution plan has been generated and is shown below.
Resource actions are indicated with the following symbols:
 + create
Terraform will perform the following actions:
 # azurerm_dev_test_global_vm_shutdown_schedule.tfvm01sd will be created
 + resource "azurerm_dev_test_global_vm_shutdown_schedule" "tfvm01sd" {
     + daily_recurrence_time = "1900"
     + enabled               = true
     + id                    = (known after apply)
     + location              = "eastus"
     + timezone              = "Pacific Standard Time"
     + virtual_machine_id    = (known after apply)
     + notification_settings {
         + enabled         = false
         + time_in_minutes = 30
       }
   }
 # azurerm_linux_virtual_machine.tfvm01 will be created

(中略)

Do you want to perform these actions?
 Terraform will perform the actions described above.
 Only 'yes' will be accepted to approve.

 Enter a value: yes

azurerm_public_ip.tfpublicip01: Creating...

(中略)

Apply complete! Resources: 8 added, 0 changed, 0 destroyed.
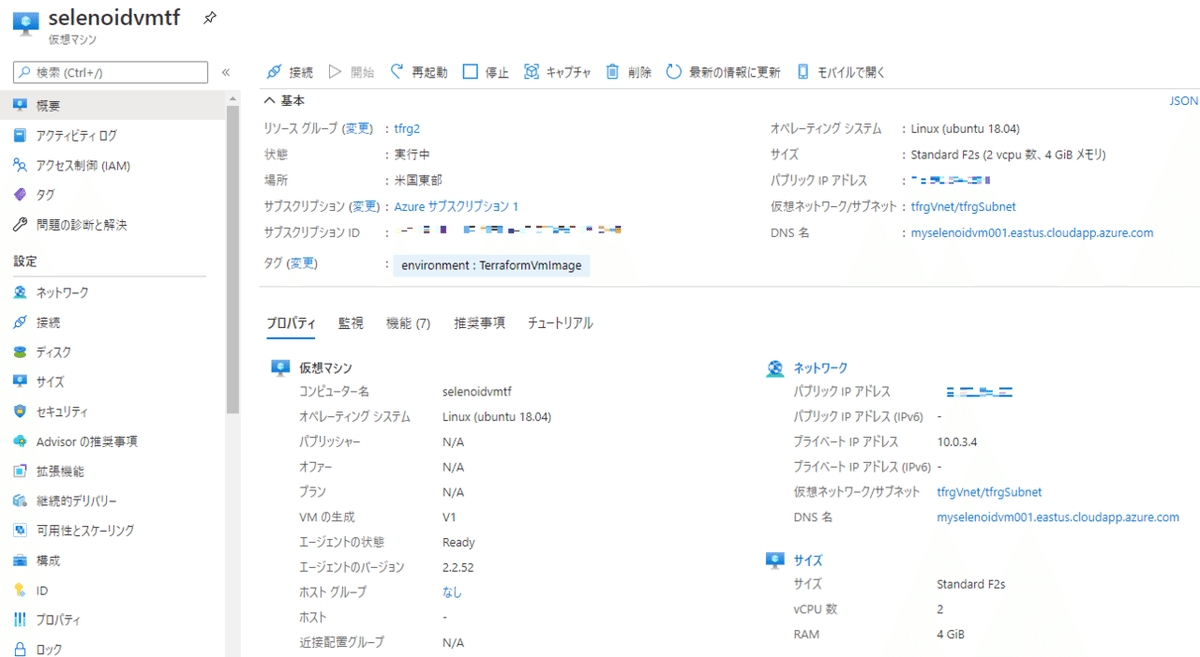
正しく実行完了しました。
こちらもAzurePortalで確認してみます。

作成できています。
■テスト再実行
例のごとくテストを実行します。
既に以前のテストコンテナがあるので、単純にdocker container start します。
> docker start demo-test

[INFO] Scanning for projects...

(中略)

-------------------------------------------------------
T E S T S
-------------------------------------------------------
Running com.aerokube.selenoid.DemoTest
Dec 22, 2020 4:04:55 AM org.openqa.selenium.remote.DesiredCapabilities chrome
INFO: Using `new ChromeOptions()` is preferred to `DesiredCapabilities.chrome()`
Dec 22, 2020 4:05:59 AM org.openqa.selenium.remote.ProtocolHandshake createSession
INFO: Detected dialect: W3C
Tests run: 1, Failures: 0, Errors: 0, Skipped: 0, Time elapsed: 70.231 sec
Results :
Tests run: 1, Failures: 0, Errors: 0, Skipped: 0
[INFO]
[INFO] --- maven-jar-plugin:2.4:jar (default-jar) @ demo-test ---

(中略)

[INFO] ------------------------------------------------------------------------
[INFO] BUILD SUCCESS
[INFO] ------------------------------------------------------------------------
[INFO] Total time:  01:15 min
[INFO] Finished at: 2020-12-22T04:06:06Z
[INFO] ------------------------------------------------------------------------
正常にテストが完了しました。
エビデンスの確認をします。
> scp -i ~/.ssh/id_rsa azureuser@myselenoidvm001.eastus.cloudapp.azure.com:/usr/local/selenoid/video/* c:\tmp\docker\mvn\このコマンドを実行すると恐らく以下のエラーが発生します。
@@@@@@@@@@@@@@@@@@@@@@@@@@@@@@@@@@@@@@@@@@@@@@@@@@@@@@@@@@@
@       WARNING: POSSIBLE DNS SPOOFING DETECTED!          @
@@@@@@@@@@@@@@@@@@@@@@@@@@@@@@@@@@@@@@@@@@@@@@@@@@@@@@@@@@@
The ECDSA host key for myselenoidvm001.eastus.cloudapp.azure.com has changed,
and the key for the corresponding IP address ***.***.***.***
is unknown. This could either mean that
DNS SPOOFING is happening or the IP address for the host
and its host key have changed at the same time.
@@@@@@@@@@@@@@@@@@@@@@@@@@@@@@@@@@@@@@@@@@@@@@@@@@@@@@@@@@@
@    WARNING: REMOTE HOST IDENTIFICATION HAS CHANGED!     @
@@@@@@@@@@@@@@@@@@@@@@@@@@@@@@@@@@@@@@@@@@@@@@@@@@@@@@@@@@@
IT IS POSSIBLE THAT SOMEONE IS DOING SOMETHING NASTY!
Someone could be eavesdropping on you right now (man-in-the-middle attack)!
It is also possible that a host key has just been changed.
The fingerprint for the ECDSA key sent by the remote host is
SHA256:***********************************************
Please contact your system administrator.
Add correct host key in C:\\Users\\<ユーザフォルダ>/.ssh/known_hosts to get rid of this message.
Offending ECDSA key in C:\\Users\\<ユーザフォルダ>/.ssh/known_hosts:1
ECDSA host key for myselenoidvm001.eastus.cloudapp.azure.com has changed and you have requested strict checking.
Host key verification failed.
前回Ansibleで作成したDNS名も同じ
myselenoidvm001.eastus.cloudapp.azure.com
なのですが、当時とIPが変わっているので中間者攻撃を受けている可能性があるよ!(つまり全然別のサーバへ誘導されている可能性あり)と警告してくれているのですね。
一度SSHでアクセスしたサーバ情報はローカルにknown_hostsという形で保存される(フィンガープリント)ので、そこと比較して警告を出してくれているのです。
これはサーバを作り直した時にはよく起こる事象で、今回に関しては問題ないので以下のコマンドを叩いてフィンガープリントを初期化しましょう。
> ssh-keygen -R myselenoidvm001.eastus.cloudapp.azure.com

# Host myselenoidvm001.eastus.cloudapp.azure.com found: line 1
C:\Users\<ユーザフォルダ>/.ssh/known_hosts updated.
Original contents retained as C:\Users\<ユーザフォルダ>/.ssh/known_hosts.old
改めて実行します。
> scp -i ~/.ssh/id_rsa azureuser@myselenoidvm001.eastus.cloudapp.azure.com:/usr/local/selenoid/video/* c:\tmp\docker\mvn\

The authenticity of host 'myselenoidvm001.eastus.cloudapp.azure.com (***.***.***.***)' can't be established.
ECDSA key fingerprint is SHA256:*********************************************************

Are you sure you want to continue connecting (yes/no)?

Warning: Permanently added 'myselenoidvm001.eastus.cloudapp.azure.com,***.***.***.***' (ECDSA) to the list of known hosts.
d305e89a9f21c6174140a60dcc053b80.mp4      100%  300KB 363.8KB/s   00:00

protocol error: lost connection
Are you sure you want to continue connecting (yes/no)?にはyesと答えます。
これでローカルに実行動画がDLされます。
正しく実行できていることが確認できました。
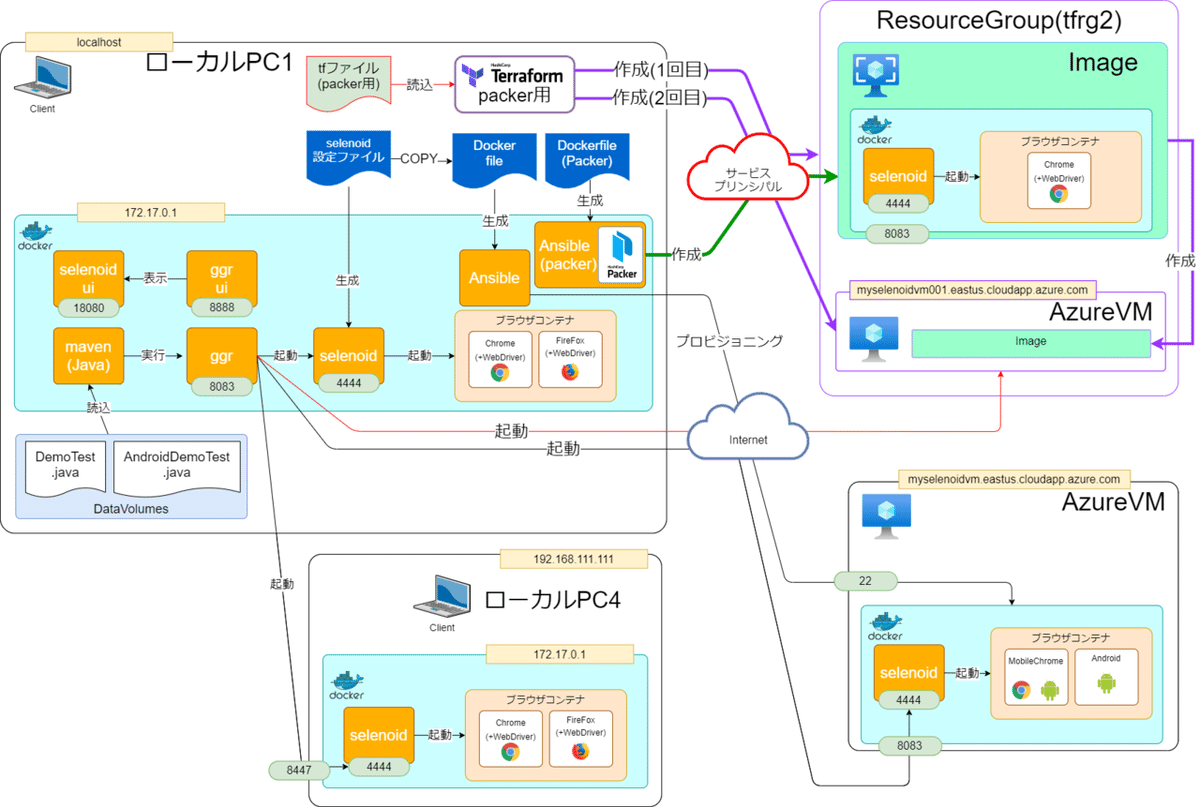
今回作成された構成

■まとめ
実際の構築手順
1. packer_node.jsonの準備
2. Dockerfileの作成(既存からコピー)
3. variables.tfの作成
4. selenoid_vmimage.tf(既存からコピー)
5. 既存VMの削除(第7回をdestroy)
6. 上記4.で準備したtfファイルのコメントアウト
7. terraform apply
8. Dockerイメージ作成
9. Docker run
10. 上記6.のコメントを戻す
11. terraform apply
12. テスト実行
==================================================
今回も長くなってしまいました。
ゴールデンイメージさえあれば、今後はtfファイルだけで構築が可能です。
つまりtfファイルをフォルダごとコピーしてDNS名変えて、Terraform applyコマンドを叩くだけで簡単に同一環境を増やせるようになるのです。
さて、次回シリーズ最終回としてVMのスケールアウトにチャレンジしてみようと思います。
ではでは。
――――――――――――――――――――――――――――――――――
執筆者プロフィール:石丸圭
スクラムを中心にテストのアジリティーを高めるべく
日々仕事のリードタイム・プロセスタイムの圧縮に奮闘中。
3児のパパ(7歳4歳1歳)。
MUPうさぎクラス。
個人的なご相談はインスタDMにてどうぞー。
Instagram:@theboyalex
【ご案内】
テスト自動化のご相談は以下までお気軽にご連絡ください。
https://forms.office.com/Pages/ResponsePage.aspx?id=IkyjGtUOzUeqMMEbzjGdlSf__O4V1URMn-5BpGP8xd9UNE9ESkRPUEs1Wk9FM0REU1BXODFBSkI0MC4u
お問合せはお気軽に
https://service.shiftinc.jp/contact/
SHIFTについて(コーポレートサイト)
https://www.shiftinc.jp/
SHIFTのサービスについて(サービスサイト)
https://service.shiftinc.jp/
SHIFTの導入事例
https://service.shiftinc.jp/case/
お役立ち資料はこちら
https://service.shiftinc.jp/resources/
SHIFTの採用情報はこちら
https://recruit.shiftinc.jp/career/

