【Next.js】React Hook FormとYupを使って入力フォームを実装してみた。
はじめに
こんにちは、SHIFT DAAE(ダーエ)テクノロジーGのイケモトです。
今回は、React Hook FormとYupを用いた入力フォームの実装方法についてまとめました。
React Hook FormとYupを組み合わせることで、フォームの入力項目が多かったりバリデーション項目が複雑になっても効率的かつ直感的に実装することができ、とても便利です。
React Hook FormとYupの利用を検討している方や、公式のドキュメントを読んだけどいまいち実装の方法がわからないという方はぜひ参考にしてください。
環境
Windows10 22h2
Next.js 14.0.4
React 18
Sass 1.69.7
React Hook Form 7.49.2
@hookform/resolvers 3.3.4
Yup 1.3.3
Visual Studio Code 1.84.1
前提
Next.jsのプロジェクトを作成する
ここではNext.jsのプロジェクトを作成するまでの環境構築については触れません。
Next.jsのドキュメント を参考に作成しましょう。
必要なライブラリをインストールする
作成したNext.jsのプロジェクトに
React Hook Form
Yup
@hookform/resolvers
の3種類をインストールします。
コマンドに関しては下記のものを参考にしてください。
//TERMINAL
npm install react-hook-form yup @hookform/resolvers
実装を行う前に各ライブラリについて簡単に触れていきます。
React Hook Form
React Hook Formとはインプット要素に入力されたデータの取得やバリデーション機能を備えたReact向けのライブラリになっています。
このライブラリを用いることで簡単に入力フォームを実装することができます。
Yup
各入力フォームごとに異なるバリデーションを定義できます。 React Hook Formのみでも入力フォームを実装することは可能ですが、必須項目チェック、正規表現チェックなど多様なバリデーションルールが設定できるので採用しています。
@hookform/resolvers
React Hook Formと外部のバリデーションライブラリ(今回はYup)を組み合わせるために必要になります。
Yupを使ってバリデーションの実装
最初にYupを使って、バリデーションを実装します。
先にバリデーションのコードを全て載せておきます。
//src/components/form/validation.tsx
import * as Yup from 'yup';

const passwordRegex =
  /^(?=.*[A-Z])(?=.*\d)(?=.*[@$!%*#?&])[A-Za-z\d@$!%*#?&]{10,}$/;

export const schema = Yup.object().shape({ // 1
  fullName: Yup.string().required("入力必須の項目です。"), // 2
  email: Yup.string()
    .required("入力必須の項目です。")
    .email("メールアドレスの形式が不正です。"), // 3
  password: Yup.string()
    .required("入力必須の項目です。")
    .matches(.matches(passwordRegex, "※パスワードは大文字、数字、特殊文字を含む英数字10文字以上で設定してください"), // 4
  confirmPassword: Yup.string()
    .required("入力必須の項目です")
    .oneOf([Yup.ref("password")], "パスワードが一致していません。") //5
});まず始めに、object()を使用して入力フォームの入力値をオブジェクトとして定義します。次に、shape()を使って具体的なデータ形式を指定します。
required()を使用すると、その項目は入力が必須となります。
email()を使用すると、その項目はメールアドレスの形式でなければならないという条件が追加されます。
matches()を使用すると、独自に定義した正規表現を適用することができます。
oneOf()を使用すると、指定した値のいずれかと一致することを確認できます。今回はYup.ref()を併用して、特定の入力フォームの値と一致するかどうかを検証しています。
さらに、min()やmax()などを使って入力文字数の制限も設けることができます。ただし、全ての制限を詳細に解説すると範囲が広くなるため、他の制限について詳しく知りたい方はYupのGitHub を参照してください。
ユーザー登録画面の実装
//src/components/form/form.module.scss
.formWrapper {
  display: flex;
  flex-direction: column;
  text-align: center;
  margin:0 auto;
  padding-left: 10%;
  padding-right: 10%;
}

.formItemWrapper{
  display: flex;
  flex-direction: column;
  text-align: start;
  padding: 24px 0;
}

.formErrorMessage{
  text-align: left;
  color: red;
}
//src/components/form/form.tsx
"use client";
import { yupResolver } from "@hookform/resolvers/yup";
import yup from "yup";
import { useForm, SubmitHandler } from "react-hook-form";
import { schema } from "./validation";
import styles from "./form.module.scss";
// 1
type ContactFormData = yup.InferType<typeof schema>;
export const Form = () => {
// 2
const { register, handleSubmit, formState } = useForm<ContactFormData>({
resolver: yupResolver(schema), // Yupとの紐づけ
mode: "onBlur", // バリデーションチェックのタイミングを設定
});
const onSubmit: SubmitHandler<ContactFormData> = (data) => {
//入力したデータを使って任意の処理を実装する
console.log(data);
};
// 3
return (
<form className={styles.formWrapper} onSubmit={handleSubmit(onSubmit)}>
<h1>
会員登録
</h1>
<div>
会員登録に必要な情報をご入力ください。
</div>
<div className={styles.formItemWrapper}>
<label>フルネーム</label>
<input {...register("fullName")} />
<span className={styles.formErrorMessage}>{formState.errors.fullName?.message}</span>
</div>
<div className={styles.formItemWrapper}>
<label>メールアドレス</label>
<input {...register("email")} />
<span className={styles.formErrorMessage}>{formState.errors.email?.message}</span>
</div>
<div className={styles.formItemWrapper}>
<label>パスワード</label>
<input type="password" autoComplete="false" {...register("password")} />
<span className={styles.formErrorMessage}>{formState.errors.password?.message}</span>
</div>
<div className={styles.formItemWrapper}>
<label>パスワード(確認)</label>
<input type="password" autoComplete="false" {...register("confirmPassword")} />
<span className={styles.formErrorMessage}>{formState.errors.confirmPassword?.message}</span>
</div>
<div className={styles.buttonContainer}>
<button disabled={!formState.isValid}>送信</button>
</div>
</form>
);
};cssについては、今回の入力フォームの実装とは直接関連しないため、最小限の実装に留めています。参考程度にご覧いただければと思います。
form.tsxのコードを順に解説していきます。
yup.InferType<typeof schema>を用いることで、validation.tsxで定義したスキーマオブジェクトを基にTypeを作成しています。
useFormを用いて、入力フォームの定義を行っています。
引数resolverにはyupResolverを設定し、Yupとの連携を実現します
引数modeでバリデーションチェックのタイミングを制御します。今回の例では、onBlurを設定し、入力フィールドのフォーカスが外れた際にバリデーションチェックが行われるようにしています。その他の設定値に関してはuseFormのドキュメント を参照してください。
3. useFormRegisterを用いて、各インプットフィールドに対応するバリデーションを関連付けています。 {...register(TFieldName)}という表記は一見理解しにくいかもしれませんが、useFormのドキュメントにはregisterAPI が呼び出されたときの具体的な動作について説明されています。これを参照すると理解が深まるでしょう。
//useFormドキュメントのサンプルコード

const { onChange, onBlur, name, ref } = register('firstName');
// include type check against field path with the name you have supplied.

<input
  onChange={onChange} // assign onChange event
  onBlur={onBlur} // assign onBlur event
  name={name} // assign name prop
  ref={ref} // assign ref prop
/>
// same as above
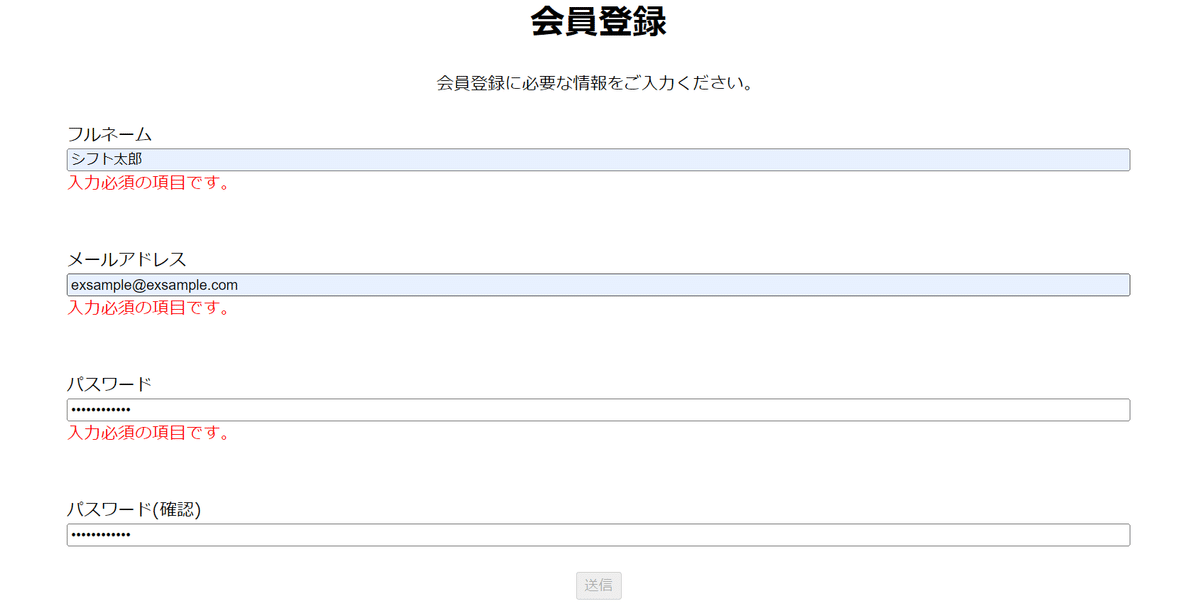
<input {...register('firstName')} />さらに、formStateを利用することで、各入力フォームにエラーメッセージの表示機能を追加し、送信ボタンでは全ての入力フォームのバリデーションチェックが通るまでボタンが押せないようにしています。
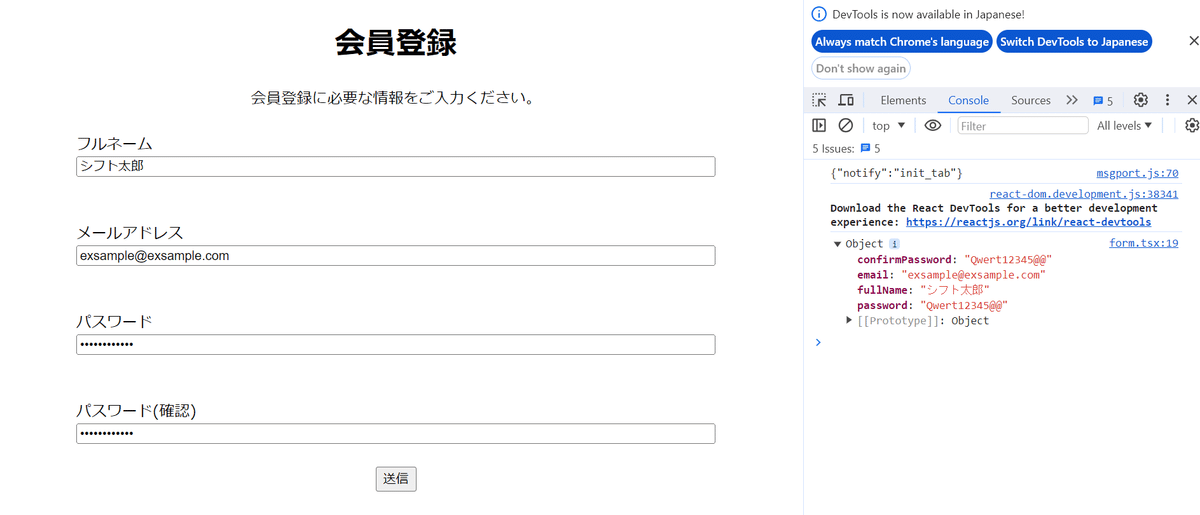
src/components/form/form.tsxまで実装することで、下の画像と同じ入力フォームが出来上がります。

(応用)自作コンポーネントをReact Hook Formで扱う
実際のプロジェクトでは、<input/>を内包した自作コンポーネントを扱うこともあると思います。
しかし、自作したコンポーネントをそのまま使ってもReact Hook Formは正しく反応しません。
この問題を解決するにはforwardRef を利用してコンポーネントを実装する必要があります。
具体的な例を挙げていきます。
下記のコードは、実際に前述のsrc/components/form/form.tsxから<input/>を切り離したものです。
//src/components/input/input.module.scss
.formItemWrapper{
  display: flex;
  flex-direction: column;
  text-align: start;
  padding: 24px 0;
}

.formErrorMessage{
  text-align: left;
  color: red;
}
//src/components/input/input.tsx
//src/components/form/form.tsxの<input/>を切り離したもの
import styles from "./input.module.scss";
import { ComponentPropsWithRef } from "react";
export type InputProps = {
labelText : string,
errorMessage? : string
} & ComponentPropsWithRef<'input'>
export const Input = ({labelText, errorMessage, ref, ...props} : InputProps) => {
return (
<div className={styles.formItemWrapper}>
<label>{labelText}</label>
<input ref={ref} {...props}/>
<span className={styles.formErrorMessage}>{errorMessage}</span>
</div>
);
}// src/components/form/form.tsx
"use client";
import { yupResolver } from "@hookform/resolvers/yup";
import yup from "yup";
import { useForm, SubmitHandler } from "react-hook-form";
import { schema } from "./validation";
import styles from "./form.module.scss";
import { Input } from "../input/input";
type ContactFormData = yup.InferType<typeof schema>;
export const Form = () => {
const { register, handleSubmit, formState } = useForm<ContactFormData>({
resolver: yupResolver(schema),
mode: "onBlur",
});
const onSubmit: SubmitHandler<ContactFormData> = (data) => {
//入力したデータを使って任意の処理を実装する
console.log(data);
};
return (
<form className={styles.formWrapper} onSubmit={handleSubmit(onSubmit)}>
<h1>
会員登録
</h1>
<div>
会員登録に必要な情報をご入力ください。
</div>
<Input type="text" labelText="フルネーム" {...register("fullName")}/>
<Input type="text" labelText="メールアドレス" {...register("email")}/>
<Input type="password" autoComplete="false" labelText="パスワード"{...register("password")}/>
<div className={styles.buttonContainer}>
<button disabled={!formState.isValid}>送信</button>
</div>
</form>
);
};しかし、このinput.tsxではregisterが正しく動作せず、たとえ入力フォームに正しい値が入力されていても、送信ボタンを押すことができません。

これはregisterがrefを通じて入力フォーム要素の値、フォーカス、エラー状態にアクセスしている一方で、Reactでは親コンポーネントが子コンポーネントのrefに直接アクセスできないため、registerもアクセスできない状態になっているからです。
これを解決するために、forwardRefを利用して先ほどのinput.tsxを書き直します。
forwardRefを使うことで、親コンポーネントが子コンポーネントのrefにアクセスできるようになります。
//src/components/input/input.tsx
import  { ComponentPropsWithRef, forwardRef } from "react";
import styles from "./input.module.scss";

export type InputProps = {
    labelText : string,
    errorMessage? : string,
} & ComponentPropsWithRef<"input">

export const Input = forwardRef<HTMLInputElement, InputProps>((
    {
        labelText,
        errorMessage,
        ...props
    }: InputProps,
    ref
) => {
    return (
        <div className={styles.formItemWrapper}>
            <label>{labelText}</label>
            <input ref={ref} {...props}/>
            <span className={styles.formErrorMessage}>{errorMessage}</span>
        </div>
    );
});
これで無事にregisterがrefを参照できるようになりました。
おわりに
この記事で紹介した以外にも、React Hook FormとYupを組み合わせることで、さまざまなバリデーションを持つ入力フォームを実装することが可能です。
自分自身もまだまだ勉強中の身ですが、これからも入力フォームを備えたものを実装する機会はたくさんあると思うので、理解を深めていき開発速度を上げていきたいです。
参考サイト
Home | React Hook Form - Simple React forms validation
https://www.react-hook-form.com/react-hook-form/resolvers
https://github.com/react-hook-form/resolvers
\もっと身近にもっとリアルに!DAAE公式Twitter/
執筆者プロフィール:Ikemoto Fumito
Unity・C#でのゲーム開発やKotlin・JavaでのAndroidアプリ実装を主に行ってました。
最近では、TS + Nextでのフロントエンド開発に携わっています。
お問合せはお気軽に
https://service.shiftinc.jp/contact/
SHIFTについて(コーポレートサイト)
https://www.shiftinc.jp/
SHIFTのサービスについて(サービスサイト)
https://service.shiftinc.jp/
SHIFTの導入事例
https://service.shiftinc.jp/case/
お役立ち資料はこちら
https://service.shiftinc.jp/resources/
SHIFTの採用情報はこちら
https://recruit.shiftinc.jp/career/
PHOTO:UnsplashのGabriel Heinzer

