
terraformでクラウド構築の省力化
経緯
株式会社システムアイでインフラエンジニアをしている川合です。
少し前から、AWSやAzureなどでゲートウェイからインスタンスなどを決まった構成で組めるようにしたい。とか、インスタンスの構築方法自体を変更管理したい、クラウド構築を共有したい、というケースが生じたので、terraformを使ってIaC化しようと思って軽く触ってみました。
今回使用したコードはこちらにアップしています。
https://github.com/kwryoh/sample_terraform
terraform とは
terraform は、Ansible のように AWS などのクラウド環境をコードで表すことができるツールの1つです。
基本として、terraform では EC2のインスタンスやVPCの設定を、"resource {}"という単位で定義していきます。例えば、EC2インスタンスを構築する場合、次のようなコードとなります。
provider "aws" {
  profile = "default"
  region  = "ap-northeast-1"
}

resource "aws_instance" "app_server" {
  ami           = "ami-830c94e3"
  instance_type = "t3.micro"

  tags = {
    Name = "TFSampleInstance"
  }
}
"ami"、"ap-northeast-1"や"t3.micro"など見たことある名称がありますね。
こんな形でわりと直感的に、クラウド環境構築を定義でき、コードであるため、Gitで管理かつ共有も可能になります。
terraform からインスタンスの作成をするには次のコマンドを実行します。
# リソースの作成
$ terraform apply
# リソースの削除
$ terraform destroy
terraform で AWS の EC2 をたてるまで
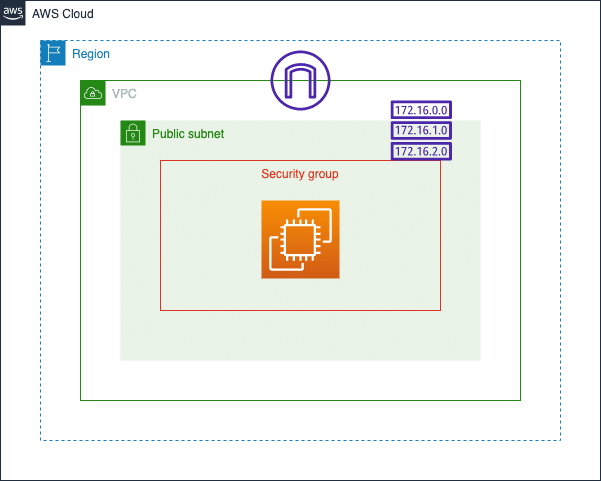
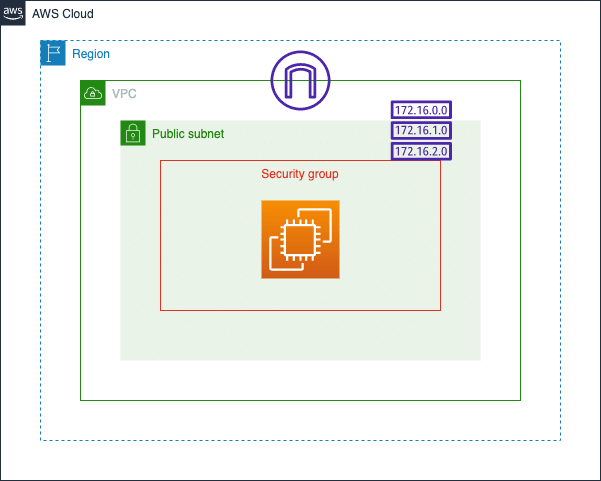
ここでは下図のような単純な EC2 インスタンスを作ることを目的とします。
環境準備
まず terraform をインストールします。Mac の場合は brew を使うと容易にインストールできます。また、Windows の場合は scoop や chocolatey を使うと同じようにインストールできます。
インストール方法の詳細についてはこちらをご参照ください。
https://learn.hashicorp.com/tutorials/terraform/install-cli
# for Mac
$ brew install terraform
# for Windows
> scoop install terraform
# or
> choco install terraform
正常にインストールできたか次のコマンドで確認します。
$ terraform -version次に AWC CLI をインストールします。これも brew でインストールします。(Windows は scoop または chocolatey)
他 OS の場合はこちらを見てください。
https://docs.aws.amazon.com/ja_jp/cli/latest/userguide/getting-started-install.html
# for Mac
$ brew install awscli
# for Windows
> scoop install aws
# or
> choco install awscli
次のコマンドでインストールができたか確認します。
aws --version作業ディレクトリを作成し、移動します。
$ install -m 0755 terraform-aws-sample
$ cd terraform-aws-sample
terraform の準備
terraform で AWS にインスタンスを構築するに当たり、AWSへのアクセスが必要なため、アクセスキーとシークレットキーを環境変数に設定します。
# for Mac
# AWSのアクセスキー
$ export AWS_ACCESS_KEY_ID="<YOUR_AWS_ACCESS_KEY_ID>"
# AWSのシークレットキー
$ export AWS_SECRET_ACCESS_KEY="<YOUR_AWS_SECRET_ACCESS_KEY>"
# リージョン名
$ export AWS_DEFAULT_REGION="<YOUR_AWS_DEFAULT_REGION>"

# for Windows
# AWSのアクセスキー
> set AWS_ACCESS_KEY_ID="<YOUR_AWS_ACCESS_KEY_ID>"
# AWSのシークレットキー
> set AWS_SECRET_ACCESS_KEY="<YOUR_AWS_SECRET_ACCESS_KEY>"
# リージョン名
> set AWS_DEFAULT_REGION="<YOUR_AWS_DEFAULT_REGION>"
ではファイルを用意しましょう。
ファイル名を "main.tf" として、次の内容を記載します。
terraform {
  required_providers {
    aws = {
      source  = "hashicorp/aws"
      version = "~> 3.0"
    }
  }

  required_version = ">= 0.14.9"
}

provider "aws" {
  region = "ap-northeast-1"
}
一度ファイルを保存して閉じます。
次にterraformの環境準備をします(providerに沿ったプラグインのダウンロード)。
$ terraform initそして、正しく記載できているか確認するため、次のコマンドを実行します。”Success! The configuration is valid.”と表示されればOKです。
$ terraform validate
Success! The configuration is valid.
EC2インスタンスの定義
再度、main.tfを開きます。
terraformではresourceでEC2などを定義するため、provider の下辺りに resourceを記述していきます。
provider "aws" {
  region = "ap-northeast-1"
}

# ↓を追記
resource "aws_instance" "demo" {
  ami           = "ami-02c3627b04781eada" # AmazonLinux2のAMI ID
  instance_type = "t3.micro"

  tags = {
    Name = "tf-demo"
  }
}
resourceの構文は、
resource "リソースタイプ" "任意の定義名" {
  リソース内の設定値
}
の形式で記述します。
今回はEC2インスタンスの定義のため、リソースタイプは"aws_instance"となります。
resource内の内容はリソースタイプによって異なります。EC2インスタンスの場合は、"ami"と"instance_type"が最低あれば構築できます。
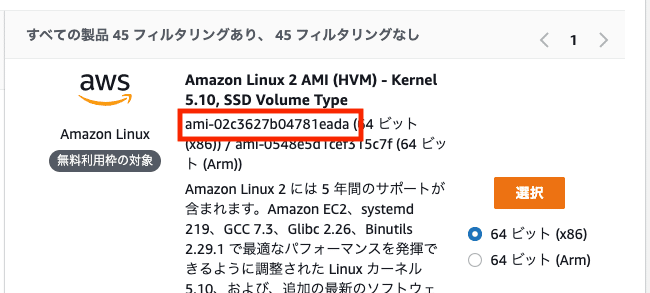
ami に指定する値はAMIカタログなどで表示されているAMI IDです。
instance_type はそのままですね。今回は"t2.micro"にしています。
最後に、tagsという部分について触れておきますと、これはインスタンスのタグを指定おり、上記のように"Name"タグを指定することで、(コンソールなどで表示される)インスタンス名を設定しています。
terraform を使ってリソースの生成・削除
以下のコマンドでどのような構成でリソースが作成されるか確認しましょう。
$ terraform plan実行計画(どういう構成で環境構築を行うかの構成内容)を確認できます。
計画内容に問題なければ次のコマンドで環境構築を行います。
$ terraform apply上記コマンド実行後次の確認が出るので"yes"と入力し、処理をすすめるとインスタンスが生成されます。
Do you want to perform these actions?
  Terraform will perform the actions described above.
  Only 'yes' will be accepted to approve.

  Enter a value: yes
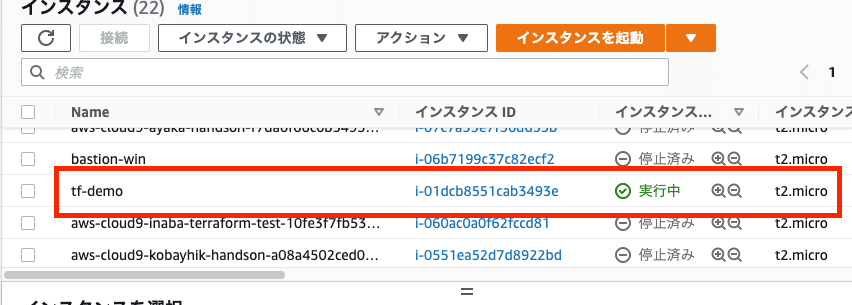
EC2の画面側で確認すると作成したインスタンスが確認できるかと思います。
確認できたら忘れず削除しておきましょう。
$ terraform destroyネットワークの作成
前述でEC2インスタンスを作成したので、そのインスタンスが外部接続可能なようにネットワークの準備をします。
VPC
VPCを構成するため、以下のコードをさきほどの main.tf に追記してください。
resource "aws_vpc" "demo_vpc" {
  cidr_block           = "10.0.0.0/16"
  enable_dns_hostnames = true

  tags = {
    Name = "tf-demo"
  }
}
参照: Terraform Registry - aws_vpc
$ terraform planで確認し、
$ terraform applyでVPCを適用させます。
AWSマネジメントコンソールからVPCが作成されているか確認しておきましょう。
サブネット
次に、サブネットを構成します。以下のコードをさきほどの main.tf に追記してください。
resource "aws_subnet" "demo_subnet" {
  vpc_id                  = aws_vpc.demo_vpc.id
  cidr_block              = "10.0.1.0/24"
  map_public_ip_on_launch = true

  tags = {
    Name = "tf-demo"
  }
}
参照: Terraform Registry - aws_subnet
$ terraform planで適用内容を確認し、
$ terraform applyでサブネットを適用させます。
AWSマネジメントコンソールで作成されているか確認します。
Internet Gateway
外部アクセスのためInternet Gatewayを作ります。以下のコードを main.tf に追記してください。
resource "aws_internet_gateway" "demo_igw" {
  vpc_id = aws_vpc.demo_vpc.id

  tags = {
    Name = "tf-demo"
  }
}
参照: Terraform Registry - aws_internet_gateway
$ terraform planで適用内容を確認し、
$ terraform applyで適用させます。AWSマネジメントコンソールで作成されているか確認します。
Route Table、Route Table Association
Internet Gatewayを通じてアクセスができるよう、ルーティング設定をします。
以下のコードを main.tf に追記します。
resource "aws_route_table" "demo_rt_tbl" {
  vpc_id = aws_vpc.demo_vpc.id

  route {
    cidr_block = "0.0.0.0/0"
    gateway_id = aws_internet_gateway.demo_igw.id
  }

  tags = {
    Name = "tf-demo"
  }
}
参照: Terraform Registry - aws_route_table
また、ルーティング設定とサブネットの紐付け設定も追記します。
resource "aws_route_table_association" "demo_rt_assoc" {
  subnet_id      = aws_subnet.demo_subnet.id
  route_table_id = aws_route_table.demo_rt_tbl.id

  tags = {
    Name = "tf-demo"
  }
}
参照: Terraform Registry - aws_route_table_association
$ terraform planで適用内容を確認し、
$ terraform applyで適用させます。
Security Group
最後にファイアウォール設定をします。
今回はSSH接続とWeb接続を許可します。
まず、大枠のセキュリティグループを作成します。
resource "aws_security_group" "demo_sg" {
  vpc_id = aws_vpc.demo_vpc.id
  name = "tf-demo"
  description = "Terraform Demo"

  tags = {
    Name = "tf-demo"
  }
}
参照: Terraform Registry - aws_security_group
次に、ここのルールを追記していきます。
# Outbound 設定
resource "aws_security_group_rule" "demo_egress_allow_all" {
  type              = "egress"
  from_port         = 0
  to_port           = 0
  protocol          = "-1"
  cidr_blocks       = ["0.0.0.0/0"]
  security_group_id = aws_security_group.demo_sg.id
}

# SSH接続
resource "aws_security_group_rule" "demo_allow_ssh" {
  description       = "Allow SSH"
  type              = "ingress"
  from_port         = 22
  to_port           = 22
  protocol          = "tcp"
  cidr_blocks       = ["0.0.0.0/0"]
  security_group_id = aws_security_group.demo_sg.id
}

# HTTP接続
resource "aws_security_group_rule" "demo_allow_http" {
  description       = "Allow HTTP"
  type              = "ingress"
  from_port         = 80
  to_port           = 80
  protocol          = "tcp"
  cidr_blocks       = ["0.0.0.0/0"]
  security_group_id = aws_security_group.demo_sg.id
}
一通り記述したら、
$ terraform planで適用内容を確認し、
$ terraform applyで適用させます。
これで一通りの準備が整いました。(ElasticIPを使いたい場合はElasticIPのリソースも作成します)
EC2の外部公開
EC2を作成したVPC、セキュリティグループに所属させることで外部からアクセスできるようにしていきます。
EC2をサブネットに所属させる
初めに記載したEC2リソースの記述を下記のように編集します。
resource "aws_instance" "demo" {
  ami                    = "ami-02c3627b04781eada" # AmazonLinux2のAMI ID
  instance_type          = "t3.micro"
  # ↓追記
  subnet_id              = aws_subnet.demo_subnet.id
  vpc_security_group_ids = [aws_security_group.demo_sg.id]
  # ↑ここまで

  tags = {
    Name = "tf-demo"
  }
}
いつもどおり
$ terraform planで適用内容を確認し、
$ terraform applyで適用させます。
ログイン用SSH鍵を設定
最後にSSH接続ができるようにインスタンスに設置する鍵を指定します。
なお、SSH鍵は先にAWSマネジメントコンソールで作成しておきます(ここの自動化する方法がありますが、今回は手動で作成することにします)。
先程のEC2インスタンスのリソースに設定を追加します。
resource "aws_instance" "demo" {
  ami                    = "ami-02c3627b04781eada" # AmazonLinux2のAMI ID
  instance_type          = "t3.micro"
  subnet_id              = aws_subnet.demo_subnet.id
  vpc_security_group_ids = [aws_security_group.demo_sg.id]
  key_name               = "登録済みSSH鍵名"

  tags = {
    Name = "tf-demo"
  }
}
記述したら
$ terraform planで適用内容を確認し、
$ terraform applyで適用します。
次のコマンドで外部公開のDNS名を取得し、接続できるか試してみましょう。
$ terraform show | grep -e "public_dns"
# => ec2-18-181-217-113.ap-northeast-1.compute.amazonaws.com など接続DNS名を取得

$ ssh ec2-XXX-XXX-XXX-XXX.ap-northeast-1.compute.amazonaws.com
一通り操作を終えたら破棄しておきましょう。
$ terraform destroy最後に
今回細かくVPCからEC2のリソースを定義しました。
AWSの各リソースを自分で定義しないといけないためクラウド環境の構成をよく知っていないと使いこなすのは難しいです。
ただ、構成をコードの形で定義しておくと、デプロイでミスを減らせれるし、人にもお任せできるのでよいツールだなと思いました。
まだまだ説明できていない機能があり、もっと複雑な構成(インスタンスを2つ、3つ作るなど)ができるので、クラウドを使う場合はなるべくterraformで定義しようと思います。
※ちなみにterraformからはEC2インスタンスの停止はできません。
最後に、最終的なコードを載せておきます(各リソースで同じタグを設定するので、"provider"の中でdefault_tagsとして指定しています。また、ami_idはlocalsで変数定義しています)。
terraform {
  required_providers {
    aws = {
      source  = "hashicorp/aws"
      version = "~> 3.0"
    }
  }

  required_version = ">= 0.14.9"
}

# Provider
# https://registry.terraform.io/providers/hashicorp/aws/latest/docs
provider "aws" {
  region = "ap-northeast-1"

  # 全てのリソースに同じタグを設定する
  default_tags {
    tags = {
      Name = "tf-demo"
    }
  }
}

# Local Variables
# https://www.terraform.io/language/values/locals
locals {
  ami_id      = "ami-02c3627b04781eada" # AmazonLinux2のAMI
}

# Instance
# https://registry.terraform.io/providers/hashicorp/aws/latest/docs/data-sources/instance
resource "aws_instance" "demo" {
  ami                    = local.ami_id
  instance_type          = "t3.micro"
  subnet_id              = aws_subnet.demo_subnet.id
  vpc_security_group_ids = [aws_security_group.demo_sg.id]
  key_name               = "登録済みSSH鍵名"
}

# VPC
# https://registry.terraform.io/providers/hashicorp/aws/latest/docs/resources/vpc
resource "aws_vpc" "demo_vpc" {
  cidr_block           = "10.0.0.0/16"
  enable_dns_hostnames = true
}

# Subnet
# https://registry.terraform.io/providers/hashicorp/aws/latest/docs/resources/subnet
resource "aws_subnet" "demo_subnet" {
  vpc_id                  = aws_vpc.demo_vpc.id
  cidr_block              = "10.0.1.0/24"
  map_public_ip_on_launch = true
}

# Internet Gateway
# https://registry.terraform.io/providers/hashicorp/aws/latest/docs/resources/internet_gateway
resource "aws_internet_gateway" "demo_igw" {
  vpc_id = aws_vpc.demo_vpc.id
}

# Route Table
# https://registry.terraform.io/providers/hashicorp/aws/latest/docs/resources/route_table
resource "aws_route_table" "demo_rt_tbl" {
  vpc_id = aws_vpc.demo_vpc.id

  route {
    cidr_block = "0.0.0.0/0"
    gateway_id = aws_internet_gateway.demo_igw.id
  }
}

# Route Table Associate
# https://registry.terraform.io/providers/hashicorp/aws/latest/docs/resources/route_table_association
resource "aws_route_table_association" "demo_rt_assoc" {
  subnet_id      = aws_subnet.demo_subnet.id
  route_table_id = aws_route_table.demo_rt_tbl.id
}

# Security Group
# https://registry.terraform.io/providers/hashicorp/aws/latest/docs/resources/security_group
resource "aws_security_group" "demo_sg" {
  vpc_id      = aws_vpc.demo_vpc.id
  description = "Terraform Demo"
}

# Security Group Rule
# https://registry.terraform.io/providers/hashicorp/aws/latest/docs/resources/security_group_rule
resource "aws_security_group_rule" "demo_egress_allow_all" {
  type              = "egress"
  from_port         = 0
  to_port           = 0
  protocol          = "-1"
  cidr_blocks       = ["0.0.0.0/0"]
  security_group_id = aws_security_group.demo_sg.id
}
resource "aws_security_group_rule" "demo_allow_ssh" {
  description       = "Allow SSH"
  type              = "ingress"
  from_port         = 22
  to_port           = 22
  protocol          = "tcp"
  cidr_blocks       = ["0.0.0.0/0"]
  security_group_id = aws_security_group.demo_sg.id
}

resource "aws_security_group_rule" "demo_allow_http" {
  description       = "Allow HTTP"
  type              = "ingress"
  from_port         = 80
  to_port           = 80
  protocol          = "tcp"
  cidr_blocks       = ["0.0.0.0/0"]
  security_group_id = aws_security_group.demo_sg.id
}__________________________________
執筆者プロフィール:川合 亮
ホスティングサービス用サーバーの設計・構築および運用サポートに10年間携わっており、Ansibleを使ったサーバー構築の自動化やコンテナ技術を用いたデプロイの簡易化を企画からリリースまでを担当。
現在はその経験を活かしつつOpenShiftの導入支援に関する業務に従事している。
【ご案内】
ITシステム開発やITインフラ運用の効率化、高速化、品質向上、その他、情シス部門の働き方改革など、IT自動化導入がもたらすメリットは様々ございます。
IT業務の自動化にご興味・ご関心ございましたら、まずは一度、IT自動化の専門家リアルグローブ・オートメーティッド(RGA)にご相談ください!
お問合せは以下の窓口までお願いいたします。
【お問い合わせ窓口】
代表窓口:info@rg-automated.jp
URL: https://rg-automated.jp


