

protocでprotobufをコンパイルして生成されるコードを利用して、Node.jsでgRPC通信をやってみた

はじめに
こんにちは、SHIFTの開発部門に所属している Katayama です。
前回の記事、動的に.proto ファイルを読み込む@grpc/proto-loader を利用して、Node.js で gRPC を利用してみたでは、@grpc/proto-loaderを利用して動的に.proto ファイル(Protocol Buffers)を読み込み gRPC 通信する方法を試してみた。
ただ、Node.js で gRPC を実装する方法には他にも、公式のAPI Referenceに書かれている protoc(protocol buffer compiler)を用いて、.proto ファイル(Protocol Buffers)をコンパイルしてコードを生成してそれを利用するという方法がある。
今回は Node.js において、protoc を利用して.proto ファイル(Protocol Buffers)をコンパイルしてコードを生成する、いわば静的な方法をやってみたいと思う。
「@grpc/proto-loader vs protoc」の章では、両者の方法についてその比較をまとめている。
※今回は技術選定のプロセスの一環として実践したため「実運用はこうした方が良い」などあればコメントいただけると嬉しいです。また、本記事の内容は執筆時(2022-08-2)の情報です。
protoc について
Google が提供しているprotocを使うと、.proto から各言語に合わせたコードを生成する事ができる。
これの Node 版は公式のgRPC Toolsに書かれているものになる(以下、公式からの引用)。
Distribution of protoc and the gRPC Node protoc plugin for ease of installation with npm.(npm で簡単にインストールできる protoc と gRPC Node protoc plugin の配布)
では、実際にgrpc-toolsを使って.proto からコードを生成をやってみる。
※ちなみに、Node 以外の主要な言語だとAPI Referenceのサイトにどのように protoc(protocol buffer compiler)を利用するか?が書かれている(以下、公式からの引用)。
A reference guide to the code generated by the protocol buffer compiler from your .proto files.(.proto ファイルからプロトコルバッファコンパイラで生成されるコードのリファレンスガイドです)
・参考:protoc コマンドで .proto ファイルをコンパイルする (Protocol Buffers Compiler)
実際に.proto からコードを生成してみる
Node.js の protoc の利用方法については、grpc-toolsのページ以外にも、サンプルプロジェクトであるstatic_codegenやProtocol Buffers - Google's data interchange formatも参考になるだろう。
今回コンパイルする.proto ファイル(Protocol Buffers)は以下。中身としては、ユーザーを個別取得する GetUser、指定した limit・offset でユーザー一覧を取得する ListUsers、全ユーザーを取得する AllUsers、の 3 つが定義されている簡単なもの。
syntax = "proto3";

package user;

import "google/protobuf/empty.proto";
import "google/protobuf/wrappers.proto";

service User {
  rpc GetUser(GetUserRequest) returns (GetUserResponse) {}
  rpc ListUsers(ListUsersRequest) returns (ListUsersResponse) {}
  rpc AllUsers(google.protobuf.Empty) returns (ListUsersResponse) {}
}

message GetUserRequest {
  int32 id = 1;
}

message GetUserResponse {
  UserInfo user = 1;
}

message ListUsersRequest {
  google.protobuf.Int32Value limit = 1;
  google.protobuf.Int32Value offset = 2;
}

message ListUsersResponse {
  int32 total = 1;
  repeated UserInfo users = 2;
}

message UserInfo {
  int32 id = 1;
  string email = 2;
  string full_name = 3;
  int64 created_at = 4;
  int64 updated_at = 5;
}
CLI のコマンドとしては以下のようになる。
[study@localhost node-grpc]$ npx grpc_tools_node_protoc --proto_path ./protos --js_out=import_style=commonjs,binary:./pbs --grpc_out=grpc_js:./pbs user.proto上記のコマンドに関して少し補足する(おまけの「grpc_tools_node_protoc で指定できるオプション一覧」に protoc で利用できるオプションを列挙しているので合わせて参照ください)。
--proto_path ./protos
これは.proto ファイルの存在するパスを指定している。今回はルートディレクトリの protos フォルダ以下に ”user.proto” を配置しているので ”./protos” にしている。
--js_out=import_style=commonjs,binary:./pbs
CommonJS のモジュール管理方法でモジュールをインポートする JavaScript のファイルを、ルートディレクトリの pbs ディレクトリ以下に出力させるようにするためのコマンドオプション。
Protocol Buffers - Google's data interchange formatに記載があるように、es6 の import スタイルでのコンパイルはできない(JavaScript: es6 module generationという GitHub のイシューもあるがまだ Open のまま)。
Support for ES6-style imports is not implemented yet. Browsers can be supported by using Browserify, webpack, Closure Compiler, etc. to resolve imports at compile time.(ES6 形式の import のサポートは未実装です。Browserify、webpack、Closure Compiler などを使って、コンパイル時に import を解決することで、ブラウザに対応することができます。)
一見、CommonJS 形式でしか利用できないのは困りそうだが、Node.js で利用する場合、Node.js は基本的に CommonJS なので(最近では純粋な ES Modules としてライブラリが実装され、逆に CommonJS で Node の実装ができない…なんてこともあるようだが)protoc で CommonJS 形式しか選択できないのは直近では全く問題ないと思う。
また、Node.js で import・export(ES6 の構文)を使えるように webpack × Babel の設定をやってみたにあるような Webpack×Babel でトランスパイルを行う設定を入れる事で、実装自体は ES Modules で行っていても、最終的にビルド後の runtime 時には CommonJS になるので、Webpack×Babel の設定をしているプロジェクトでも CommonJS 形式しか利用できない事で問題は発生しないだろう。
※ちなみに、ブラウザにおいても同じように Webpack×Babel の設定でトランスパイルすれば、CommonJS 形式でコードが生成されても問題なく利用できるだろう。
・参考:GitHub Protocol Buffers - Google's data interchange format
・参考:CommonJS imports
--grpc_out=grpc_js:./pbs
このオプションを指定する事で、.proto ファイルをコンパイルして生成されるコードで利用させるパッケージをgrpcではなく@grpc/grpc-jsに指定できる。
それぞれのライブラリの比較についてはFeature comparison of grpc and @grpc/grpc-js packagesに詳細が書かれている。
※ちなみに、"./pbs"は protobuf をコンパイルした後のコードを出力するディレクトリを指定している部分で、今回だとプロジェクトのルートの pbs ディレクトリ以下にファイルを出力するという設定になっている。
・参考:static_codegen
protoc により生成されるコードについて
protoc を実行すると、以下のような 2 つのファイルが生成される。
[study@localhost node-grpc]$ tree ./pbs/
./pbs/
├── user_grpc_pb.js
└── user_pb.js
それぞれのファイルの役割は以下のようになっている。
user_grpc_pb.js(*__grpc_pb.js):gRPC に対応するサーバー・クライアントを提供するモジュールで、中身は proto に定義されているサービスに対応するオブジェクトが定義されている。
// user_grpc_pb.js
// 省略
var grpc = require("@grpc/grpc-js");
var user_pb = require("./user_pb.js");
var google_protobuf_empty_pb = require("google-protobuf/google/protobuf/empty_pb.js");
var google_protobuf_wrappers_pb = require("google-protobuf/google/protobuf/wrappers_pb.js");
// 省略
var UserService = (exports.UserService = {
  getUser: {
    path: "/user.User/GetUser",
    requestStream: false,
    responseStream: false,
    requestType: user_pb.GetUserRequest,
    responseType: user_pb.GetUserResponse,
    requestSerialize: serialize_user_GetUserRequest,
    requestDeserialize: deserialize_user_GetUserRequest,
    responseSerialize: serialize_user_GetUserResponse,
    responseDeserialize: deserialize_user_GetUserResponse,
  },
  // 省略
});

exports.UserClient = grpc.makeGenericClientConstructor(UserService);
user_pb.js(*_pb.js):proto に定義されたメッセージ型に対応するオブジェクトが定義されているモジュール。
// user_pb.js
// 省略
var jspb = require("google-protobuf");
var goog = jspb;
var global = Function("return this")();

var google_protobuf_empty_pb = require("google-protobuf/google/protobuf/empty_pb.js");
goog.object.extend(proto, google_protobuf_empty_pb);
var google_protobuf_wrappers_pb = require("google-protobuf/google/protobuf/wrappers_pb.js");
goog.object.extend(proto, google_protobuf_wrappers_pb);
goog.exportSymbol("proto.user.GetUserRequest", null, global);
goog.exportSymbol("proto.user.GetUserResponse", null, global);
goog.exportSymbol("proto.user.ListUsersRequest", null, global);
goog.exportSymbol("proto.user.ListUsersResponse", null, global);
goog.exportSymbol("proto.user.UserInfo", null, global);
// 省略
protoc で生成したコードを使ってサーバー・クライアントを実装する
実装するものとしては動的に.proto ファイルを読み込む@grpc/proto-loader を利用して、Node.js で gRPC を利用してみたと同じ構成のものになる。
サーバー側の実装
以下のようになる(以下は proto が追加され、他のサービスの実装を追加していく際に追加実装しやすいように、各 proto ごとにサービスの実装を分けるような形で実装してみたもの)。
import * as grpc from "@grpc/grpc-js";
import { UserService } from "../../../pbs/user_grpc_pb";
import {
  UserInfo,
  GetUserResponse,
  ListUsersResponse,
} from "../../../pbs/user_pb";

export default (server, dumyUsers) => {
  const getUser = (call, callback) => {
    const user = dumyUsers
      .filter((dumyUser) => dumyUser.id === call.request.getId())
      .shift();

    if (user) {
      const userInfo = new UserInfo();
      userInfo.setId(user.id);
      userInfo.setEmail(user.email);
      userInfo.setFullName(user.fullName);
      userInfo.setCreatedAt(user.createdAt);
      userInfo.setUpdatedAt(user.updatedAt);

      const reply = new GetUserResponse();
      reply.setUser(userInfo);

      return callback(null, reply);
    }

    return callback({
      code: grpc.status.NOT_FOUND,
      message: "user not found",
    });
  };

  const listUsers = (call, callback) => {
    const limit = call.request.hasLimit() ? call.request.getLimit() : 10;
    const offset = call.request.hasOffset() ? call.request.getOffset() : 0;

    const reply = new ListUsersResponse();
    reply.setTotal(dumyUsers.length);

    const users = dumyUsers.slice(offset).slice(0, limit);
    users.forEach((user, index) => {
      const userInfo = new UserInfo();
      userInfo.setId(user.id);
      userInfo.setEmail(user.email);
      userInfo.setFullName(user.fullName);
      userInfo.setCreatedAt(user.createdAt);
      userInfo.setUpdatedAt(user.updatedAt);
      reply.addUsers(userInfo, index);
    });

    callback(null, reply);
  };

  const allUsers = (call, callback) => {
    // 省略
  };

  server.addService(UserService, {
    getUser,
    listUsers,
    allUsers,
  });
};
上記のコードに関して少し補足をする。
call.request.getId()
動的に.proto ファイルを読み込む@grpc/proto-loader を利用して、Node.js で gRPC を利用してみたでは、"call.request.id"のようにオブジェクトのいちフィールドとして値を取得できていたが、protoc でコンパイルしたコードを利用するようになった事でリクエストはデシリアライズされたオブジェクト(GetUserRequest)として扱われるので、getId()のようにする必要がある。
// user_grpc_pb.jsの一部抜粋
function deserialize_user_GetUserRequest(buffer_arg) {
  return user_pb.GetUserRequest.deserializeBinary(new Uint8Array(buffer_arg));
}
※ちなみに、console.log(call.request)を実行すると以下のような結果になる。
{
  wrappers_: null,
  messageId_: undefined,
  arrayIndexOffset_: -1,
  array: [ 1 ],
  pivot_: 1.7976931348623157e+308,
  convertedPrimitiveFields_: {}
}
const reply = new GetUserResponse();、const reply = new ListUsersResponse();
動的に.proto ファイルを読み込む@grpc/proto-loader を利用して、Node.js で gRPC を利用してみたでは、単なるオブジェクトを callback 関数の引数に渡すだけで動作していたが、こちらも protoc でコンパイルしたコードを利用するようになった事で、シリアライズするためにレスポンスを GetUserResponse インスタンス(オブジェクト)にする必要があり、proto のメッセージに定義された型(user_pb.js に実装されている)を使った実装をしている。
// user_grpc_pb.jsの一部抜粋
function serialize_user_GetUserResponse(arg) {
  if (!(arg instanceof user_pb.GetUserResponse)) {
    throw new Error("Expected argument of type user.GetUserResponse");
  }
  return Buffer.from(arg.serializeBinary());
}
ちなみに、API リファレンス(sendUnaryData(error, value [, trailer] [, flags]))の value の説明部分にも以下のように書かれている。
The response value. Must be a valid argument to the responseSerialize method of the method that is being handled.(レスポンス値。処理するメソッドの responseSerialize メソッドへの有効な引数である必要があります。)
call.request.hasLimit()、call.request.hasOffset()
ListUsersRequest については、protoの方で以下のように定義していた。
message ListUsersRequest {
  google.protobuf.Int32Value limit = 1;
  google.protobuf.Int32Value offset = 2;
}
これは protobuf にはDefault Valuesという概念があり、int32 等にはデフォルト値というものが設定されている仕様になっている。
そのため、もし google.protobuf.Int32Value ではなく int32 とした場合、サーバー側でリクエストを受け取る際に、それがデフォルト値なのか?明示的に設定された値なのか?を区別する方法がない(int32 であれば、デフォルト値の 0 なのか、それとも明示的に設定した値で 0 なのかの区別できない)。
その場合、困る場面が出てくる(int32 のデフォルトで困る事はないかもしれないが string の場合明示的に空文字を設定したのか、デフォルト値の空文字なのかは大きな違いになるだろう)ので、Int32ValueやStringValueというラッパーした型が存在する。
今回もこれを利用して、デフォルト値か?をちゃんと判定するような実装をここでは行っている。
hasLimit()の実行結果は以下の表の通りで、単に new ListUsersRequest()をリクエストした時(setLimit()をしなかった時)だけ false になる事が分かるだろう。
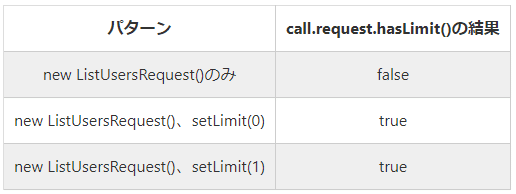
※ただし今回の実装で言えば、0 が falsy な値であり、offset はデフォルト 0 で良いので以下のように実装すれば問題ないと言える(上記のコードは、敢えて has...()を呼び出す実装にしたかったのでそうなっている)。
const limit = call.request.getLimit() || 10;
const offset = call.request.getOffset();
※Int32Value 等のラッパーされた型一覧の実装はwrappers.protoにある。
上記に関連しておまけの方に「optional について」という章もあるので、そちらも参照いただけると幸いです。
サーバーの起動
これは特に動的に.proto ファイルを読み込む@grpc/proto-loader を利用して、Node.js で gRPC を利用してみたの時と変わりなく、以下のように起動できる。
[study@localhost node-grpc]$ node dist/server.js
node dist/server.js
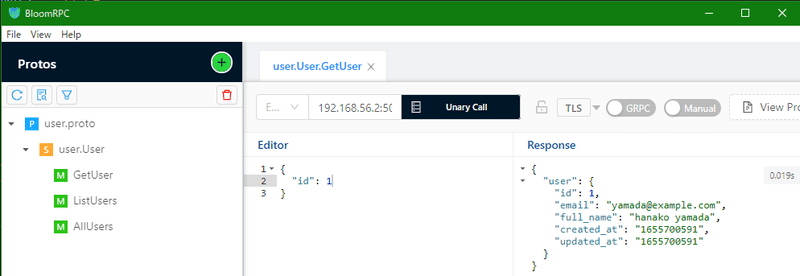
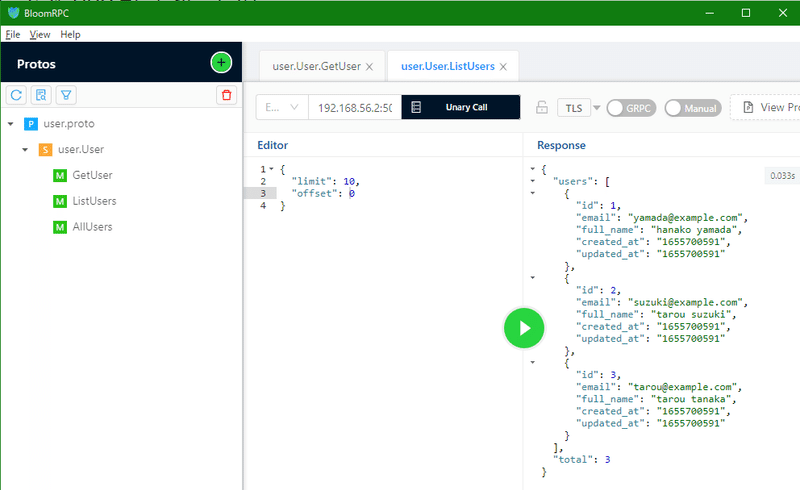
server start listing on port 50051起動後にBloomRPCで簡単なテストをしてみると、問題なく gRPC 通信できている事が確認できる。
クライアント側の実装
以下のようになる。
// index.js
// 省略
import { getUser, listUsers, allUsers } from "./clients/user";

const app = express();
const router = Router();

app.use(express.json());
app.use("/api/v1", router);

router.get("/user/:id", async (req, res) => {
  try {
    const response = await getUser(req.params.id);
    res.status(200).json(snakecaseKeys(response.toObject(), { deep: true }));
  } catch (error) {
    console.error(error);
    res.status(500).json({ message: error.message });
  }
});

router.get("/users", async (req, res) => {
  const { limit, offset } = req.query;

  try {
    const response = await listUsers(limit, offset);
    res.status(200).json(
      snakecaseKeys(
        mapKeys(response.toObject(), (value, key) => {
          if (key === "usersList") return "users";
          return key;
        }),
        { deep: true }
      )
    );
  } catch (error) {
    console.error(error);
    res.status(500).json({ message: error.message });
  }
});

router.get("/allusers", async (req, res) => {
  // 省略
});
app.listen(3000, () => console.log("listening on port 3000!"));
import * as grpc from "@grpc/grpc-js";
import { Empty } from "google-protobuf/google/protobuf/empty_pb";
import { UserClient } from "../../../pbs/user_grpc_pb";
import { GetUserRequest, ListUsersRequest } from "../../../pbs/user_pb";

const client = new UserClient(
  "0.0.0.0:50051",
  grpc.credentials.createInsecure()
);

const getUser = (id) => {
  const request = new GetUserRequest();
  request.setId(id);

  return new Promise((resolve, reject) => {
    client.getUser(request, (err, response) => {
      if (err) reject(err);
      resolve(response);
    });
  });
};

const listUsers = (limit, offset) => {
  const request = new ListUsersRequest();
  request.setLimit(limit);
  request.setOffset(offset);

  return new Promise((resolve, reject) => {
    client.listUsers(request, (err, response) => {
      if (err) reject(err);
      resolve(response);
    });
  });
};

const allUsers = () => {
  // 省略
};

export { getUser, listUsers, allUsers };
上記のコードに関して少し補足をする。
response.toObject()
サーバー側の実装と同様、protoc でコンパイルしたコードを利用しているので、gRPC で通信した結果取得されたレスポンスは GetUserResponse というオブジェクトになる。
このオブジェクトに対する操作は user_pb.js に定義されており、JavaScript の中で扱うピュアオブジェクトに変換する(JSON にする)には toObject()を呼び出す必要がある。
ちなみに、この toObject()を実行した結果は camelCase のキー構成になるので、REST API で sanake_case を使いたい等あればそのケース変換が必要になる。
今回はsnakecase-keysでそれをしている。
※toObject()を呼び出すタイミングについて、resolve(response.toObject());とする方法でも同じ結果が得られるのでそれでもいいように思えるが、もしサーバー側の実装が以下のような実装だった場合、クライアント側でレスポンスがそもそも存在するか?を判定する必要が出てくる。
そのような判定は toObject()を呼び出してピュアオブジェクトに変換してからはできないので、resolve(response);とするのが良い場面もあるだろう。
// サーバー側の実装
const getUser = (call, callback) => {
  const user = dumyUsers
    .filter((dumyUser) => dumyUser.id === call.request.getId())
    .shift();

  if (user) {
    // 省略(上記のコードと同じ)
  }

  const reply = new GetUserResponse(); // ←userが見つからない場合、空のGetUserResponseを返す(callbackの第2引数valueはprotoのメッセージ型のインスタンスである必要がある関係上)
  return callback(null, reply);
};
// クライアント側の実装
router.get("/user/:id", async (req, res) => {
try {
const response = await getUser(req.params.id);
if (!response.hasUser()) throw new CustomError(404, "user not found"); // もしユーザーが見つからない場合、response.hasUser()はfalseになる
res.status(200).json(snakecaseKeys(response.toObject(), { deep: true }));
} catch (error) {
console.error(error);
res.status(500).json({ message: error.message });
}
});上記のように response.hasUser()を呼び出すと、デフォルト値(サーバー側で何も値を設定していない)場合には戻りが false になるので、この実装をする事でユーザーが見つからなかったという事を判定するような実装が可能になる(その実装がいいかは別として)(上記のような実装で、ユーザーが見つからなかった時のレスポンスを response.toObject()すると undefined になり、snakecaseKeys で意図しないエラーが出る事になる)。
protoc でコンパイルされたコードの hasUser の実装としては以下のようになっている。
/**
 * Returns whether this field is set.
 * @return {boolean}
 */
proto.user.GetUserResponse.prototype.hasUser = function () {
  return jspb.Message.getField(this, 1) != null;
};
クライアントの起動・リクエストの結果を確認してみる
ここも動的に.proto ファイルを読み込む@grpc/proto-loader を利用して、Node.js で gRPC を利用してみたの時と変わりなく、以下のように起動できる。
[study@localhost node-grpc]$ node dist/client.js
listening on port 3000!
Express に対して REST API を呼び出すと、クライアント内で gRPC 通信を行いちゃんとレスポンスが返ってくることも確認できる。
[study@localhost node-grpc]$ curl localhost:3000/api/v1/user/1
{"user":{"id":1,"email":"yamada@example.com","full_name":"hanako yamada","created_at":1655700591,"updated_at":1655700591}}

[study@localhost node-grpc]$ curl localhost:3000/api/v1/users
{"total":3,"users":[{"id":1,"email":"yamada@example.com","full_name":"hanako yamada","created_at":1655700591,"updated_at":1655700591},{"id":2,"email":"suzuki@example.com","full_name":"tarou suzuki","created_at":1655700591,"updated_at":1655700591},{"id":3,"email":"tarou@example.com","full_name":"tarou tanaka","created_at":1655700591,"updated_at":1655700591}]}

[study@localhost node-grpc]$ curl "localhost:3000/api/v1/users?limit=1"
{"total":3,"users":[{"id":1,"email":"yamada@example.com","full_name":"hanako yamada","created_at":1655700591,"updated_at":1655700591}]}

[study@localhost node-grpc]$ curl "localhost:3000/api/v1/users?limit=1&offset=1"
{"total":3,"users":[{"id":2,"email":"suzuki@example.com","full_name":"tarou suzuki","created_at":1655700591,"updated_at":1655700591}]}
まとめとして
今回は protoc という protobuf をコンパイルしたコードを利用して Node.js で gRPC 通信を行ってみた。メッセージ型に対応するミドルウェアのようなコードが作成される事でデフォルト値なのか?の区別ができるようになったりとメリットもあるように感じた。
前回の@grpc/proto-loader を利用した実装と、protoc でコンパイルしたコードを利用した実装とで比較してみると以下のような特徴があるように思える。
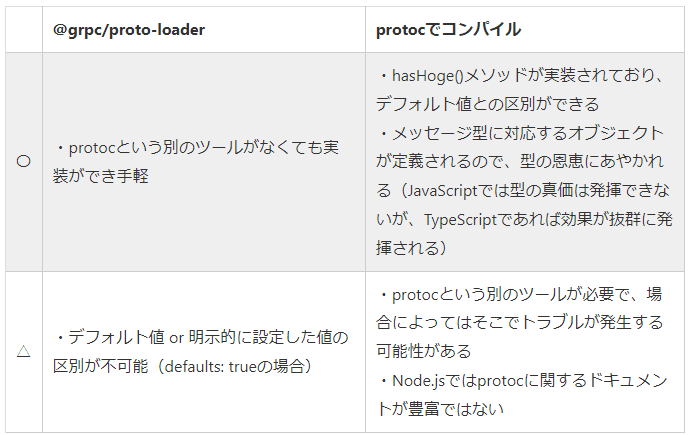
おまけ
optional について
optional は protobuf の v2 では仕様として存在していたが、v3 ではなくなった仕様。
ただ、Protocol Buffers v3.12.0から暫定的に復活し、Protocol Buffers v3.15.0のリリースにてデフォルトで有効になった仕様(つまり、v3 でも最新バージョンには optional が存在する)。
使い方としては、以下のように optional キーワードを付けるだけでいい。こうすると ListUsersRequest に limit, offset が必須ではなく任意のフィールドになる。
message ListUsersRequest {
  optional int32 limit = 1;
  optional int32 offset = 2;
}
そして、protoc でコンパイルしたコード(user_pb.js)の方には、hasLimit()や hasOffset()が実装され、「call.request.hasLimit()、call.request.hasOffset()」の章で見た時同様、デフォルト値の 0 なのか、明示的に設定した 0 なのかの区別ができるような状態になる(int32 を指定した場合においては)。
/**
 * Returns whether this field is set.
 * @return {boolean}
 */
proto.user.ListUsersRequest.prototype.hasLimit = function () {
  return jspb.Message.getField(this, 1) != null;
};

/**
 * Returns whether this field is set.
 * @return {boolean}
 */
proto.user.ListUsersRequest.prototype.hasOffset = function () {
  return jspb.Message.getField(this, 2) != null;
};
※ただ、 google.protobuf.Int32Value limit = 1;のように実装してもリクエストの際にはフィールドを省略できる(デフォルト値の考え方がある)ので、今回のように int32 のようにScalar Value Typesを利用している分には、optional int32 と google.protobuf.Int32Value の挙動で違いはないように思える。
※ちなみに、Protocol Buffers v3.12.0で仕様に復活した optional を利用する際に必要と記載されたいた"--experimental_allow_proto3_optional"オプションだが、Protocol Buffers v3.15.0のリリースにてデフォルトで有効になったので、そのオプションは不要になった。
トラブルシューティング
/home/study/workspace/node-grpc/node_modules/grpc-tools/bin/protoc: /lib64/libstdc++.so.6: version `CXXABI_1.3.8' not found (required by /home/study/workspace/node-grpc/node_modules/grpc-tools/bin/protoc)
C++のバージョンが古い事が原因。grpc-toolsを見ると確かに C++のコードがあり、これを実行する際にエラーになったと想像できる。
エラーの詳細は以下の通り。
[study@localhost node-grpc]$ yarn protoc
yarn run v1.22.19
$ npx grpc_tools_node_protoc --js_out=import_style=commonjs,binary:. --grpc_out=grpc_js:. protos/user.proto
/home/study/workspace/node-grpc/node_modules/grpc-tools/bin/protoc: /lib64/libstdc++.so.6: version `CXXABI_1.3.8' not found (required by /home/study/workspace/node-grpc/node_modules/grpc-tools/bin/protoc)
/home/study/workspace/node-grpc/node_modules/grpc-tools/bin/protoc.js:41
    throw error;
    ^

Error: Command failed: /home/study/workspace/node-grpc/node_modules/grpc-tools/bin/protoc --plugin=protoc-gen-grpc=/home/study/workspace/node-grpc/node_modules/grpc-tools/bin/grpc_node_plugin --js_out=import_style=commonjs,binary:. --grpc_out=grpc_js:. protos/user.proto
/home/study/workspace/node-grpc/node_modules/grpc-tools/bin/protoc: /lib64/libstdc++.so.6: version `CXXABI_1.3.8' not found (required by /home/study/workspace/node-grpc/node_modules/grpc-tools/bin/protoc)

    at ChildProcess.exithandler (child_process.js:383:12)
    at ChildProcess.emit (events.js:400:28)
    at maybeClose (internal/child_process.js:1058:16)
    at Socket.<anonymous> (internal/child_process.js:443:11)
    at Socket.emit (events.js:400:28)
    at Pipe.<anonymous> (net.js:686:12) {
  killed: false,
  code: 1,
  signal: null,
  cmd: '/home/study/workspace/node-grpc/node_modules/grpc-tools/bin/protoc --plugin=protoc-gen-grpc=/home/study/workspace/node-grpc/node_modules/grpc-tools/bin/grpc_node_plugin --js_out=import_style=commonjs,binary:. --grpc_out=grpc_js:. protos/user.proto'
}
error Command failed with exit code 1.
info Visit https://yarnpkg.com/en/docs/cli/run for documentation about this command.
私は CentOS7.9 を利用していたので、Missing /lib64/libstdc++.so.6: version CXXABI_1.3.8' and CXXABI_1.3.9' on Centos 7?やversion `CXXABI_1.3.8' not foundを参考にバージョンを上げた。
[study@localhost ~]$ sudo yum install gmp-devel mpfr-devel libmpc-devel wget
[study@localhost ~]$ wget https://ftp.gnu.org/gnu/gcc/gcc-8.3.0/gcc-8.3.0.tar.gz
[study@localhost ~]$ mkdir gcc-8.3.0-build
[study@localhost ~]$ tar xf gcc-8.3.0.tar.gz
[study@localhost ~]$ cd gcc-8.3.0-build
[study@localhost gcc-8.3.0-build]$ ../gcc-8.3.0/configure --enable-languages=c,c++ --disable-multilib --disable-bootstrap
[study@localhost gcc-8.3.0-build]$ make && sudo make install
[study@localhost gcc-8.3.0-build]$ export LD_LIBRARY_PATH=/usr/local/lib64:${LD_LIBRARY_PATH}上記の設定をする事で、上記のエラーは出なくなり、無事grpc-toolsが利用できるようになった。
※export LD_LIBRARY_PATH=/usr/local/lib64:${LD_LIBRARY_PATH}の部分は、.bashrc にも書いておく事で、常に環境変数を設定した状態で bash ターミナルを立ち上げられるようになる。
※How to install GCC/G++ 8 on CentOSの方法ではうまくいかなかった。これは"/usr/local/lib/../lib64"以下にインストールするわけではないからと思われる(Red Hat Developer Toolsetなどを参照)。
grpc_tools_node_protoc で指定できるオプション一覧
[study@localhost node-grpc]$ npx grpc_tools_node_protoc --help
Usage: /home/study/workspace/node-grpc/node_modules/grpc-tools/bin/protoc [OPTION] PROTO_FILES
Parse PROTO_FILES and generate output based on the options given:
  -IPATH, --proto_path=PATH   Specify the directory in which to search for
                              imports.  May be specified multiple times;
                              directories will be searched in order.  If not
                              given, the current working directory is used.
                              If not found in any of the these directories,
                              the --descriptor_set_in descriptors will be
                              checked for required proto file.
  --version                   Show version info and exit.
  -h, --help                  Show this text and exit.
  --encode=MESSAGE_TYPE       Read a text-format message of the given type
                              from standard input and write it in binary
                              to standard output.  The message type must
                              be defined in PROTO_FILES or their imports.
  --deterministic_output      When using --encode, ensure map fields are
                              deterministically ordered. Note that this order
                              is not canonical, and changes across builds or
                              releases of protoc.
  --decode=MESSAGE_TYPE       Read a binary message of the given type from
                              standard input and write it in text format
                              to standard output.  The message type must
                              be defined in PROTO_FILES or their imports.
  --decode_raw                Read an arbitrary protocol message from
                              standard input and write the raw tag/value
                              pairs in text format to standard output.  No
                              PROTO_FILES should be given when using this
                              flag.
  --descriptor_set_in=FILES   Specifies a delimited list of FILES
                              each containing a FileDescriptorSet (a
                              protocol buffer defined in descriptor.proto).
                              The FileDescriptor for each of the PROTO_FILES
                              provided will be loaded from these
                              FileDescriptorSets. If a FileDescriptor
                              appears multiple times, the first occurrence
                              will be used.
  -oFILE,                     Writes a FileDescriptorSet (a protocol buffer,
    --descriptor_set_out=FILE defined in descriptor.proto) containing all of
                              the input files to FILE.
  --include_imports           When using --descriptor_set_out, also include
                              all dependencies of the input files in the
                              set, so that the set is self-contained.
  --include_source_info       When using --descriptor_set_out, do not strip
                              SourceCodeInfo from the FileDescriptorProto.
                              This results in vastly larger descriptors that
                              include information about the original
                              location of each decl in the source file as
                              well as surrounding comments.
  --dependency_out=FILE       Write a dependency output file in the format
                              expected by make. This writes the transitive
                              set of input file paths to FILE
  --error_format=FORMAT       Set the format in which to print errors.
                              FORMAT may be 'gcc' (the default) or 'msvs'
                              (Microsoft Visual Studio format).
  --print_free_field_numbers  Print the free field numbers of the messages
                              defined in the given proto files. Groups share
                              the same field number space with the parent
                              message. Extension ranges are counted as
                              occupied fields numbers.
  --plugin=EXECUTABLE         Specifies a plugin executable to use.
                              Normally, protoc searches the PATH for
                              plugins, but you may specify additional
                              executables not in the path using this flag.
                              Additionally, EXECUTABLE may be of the form
                              NAME=PATH, in which case the given plugin name
                              is mapped to the given executable even if
                              the executable's own name differs.
  --cpp_out=OUT_DIR           Generate C++ header and source.
  --csharp_out=OUT_DIR        Generate C# source file.
  --java_out=OUT_DIR          Generate Java source file.
  --js_out=OUT_DIR            Generate JavaScript source.
  --objc_out=OUT_DIR          Generate Objective-C header and source.
  --php_out=OUT_DIR           Generate PHP source file.
  --python_out=OUT_DIR        Generate Python source file.
  --ruby_out=OUT_DIR          Generate Ruby source file.
  @<filename>                 Read options and filenames from file. If a
                              relative file path is specified, the file
                              will be searched in the working directory.
                              The --proto_path option will not affect how
                              this argument file is searched. Content of
                              the file will be expanded in the position of
                              @<filename> as in the argument list. Note
                              that shell expansion is not applied to the
                              content of the file (i.e., you cannot use
                              quotes, wildcards, escapes, commands, etc.).
                              Each line corresponds to a single argument,
                              even if it contains spaces.
参考文献
・static code generation variant of the Node examples
・サービス間通信のための新技術「gRPC」入門
・Third-Party Add-ons for Protocol Buffers
・OK Google, Protocol Buffers から生成したコードを使って Node.js で gRPC 通信して
《この公式ブロガーの記事一覧》
執筆者プロフィール:Katayama Yuta
SaaS ERPパッケージベンダーにて開発を2年経験。 SHIFTでは、GUIテストの自動化やUnitテストの実装などテスト関係の案件に従事したり、DevOpsの一環でCICD導入支援をする案件にも従事。 昨年に開発部門へ異動し、再び開発エンジニアに。
お問合せはお気軽に
https://service.shiftinc.jp/contact/
SHIFTについて(コーポレートサイト)
https://www.shiftinc.jp/
SHIFTのサービスについて(サービスサイト)
https://service.shiftinc.jp/
SHIFTの導入事例
https://service.shiftinc.jp/case/
お役立ち資料はこちら
https://service.shiftinc.jp/resources/
SHIFTの採用情報はこちら
https://recruit.shiftinc.jp/career/